EXTENSION METHOD IN C#
Introduction
Extension methods are a new feature in C# 3.0. An extension method enables us to add methods to existing types without creating a new derived type, recompiling, or modify the original types. We can say that it extends the functionality of an existing type in .NET. An extension method is a static method to the existing staticclass. We call an extension method in the same general way; there is no difference in calling.
Feature and Property of Extension Methods
The following list contains basic features and properties of extension methods:
- It is a static method.
- It must be located in a static class.
- It uses the “this” keyword as the first parameter with a type in .NET and this method will be called by a given type instance on the client side.
- It also shown by VS intellisense. When we press the dot (.) after a type instance, then it comes in VS intellisense.
- An extension method should be in the same namespace as it is used or you need to import the namespace of the class by a using statement.
- You can give any name for the class that has an extension method but the class should be static.
- If you want to add new methods to a type and you don’t have the source code for it, then the solution is to use and implement extension methods of that type.
- If you create extension methods that have the same signature methods as the type you are extending, then the extension methods will never be called.
Using the Code
We create an extension method for a string type so string will be specified as a parameter for this extension method and that method will be called by a string instance using the dot operator.
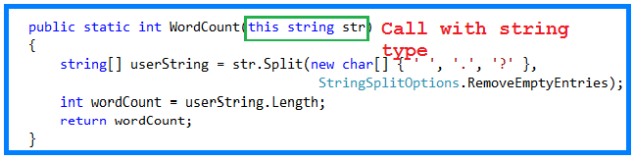
In the above method WordCount(), we are passing a string type with this so it will be called by the stringtype variable, in other words a string instance.
Now we create a static class and two static methods, one for the total word count in a string and another for the total number of characters in a string without a space.
Hide Copy Code
using System;
namespace ExtensionMethodsExample
{
public static class Extension
{
public static int WordCount(this string str)
{
string[] userString = str.Split(new char[] { ‘ ‘, ‘.’, ‘?’ },
StringSplitOptions.RemoveEmptyEntries);
int wordCount = userString.Length;
return wordCount;
}
public static int TotalCharWithoutSpace(this string str)
{
int totalCharWithoutSpace = 0;
string[] userString = str.Split(‘ ‘);
foreach (string stringValue in userString)
{
totalCharWithoutSpace += stringValue.Length;
}
return totalCharWithoutSpace;
}
}
}
Now we create an executable program that has a string as an input and uses an extension method to count the total words in that string and the total number of characters in that string then show the result in a console screen.
Hide Copy Code
using System;
namespace ExtensionMethodsExample
{
class Program
{
static void Main(string[] args)
{
string userSentance = string.Empty;
int totalWords = 0;
int totalCharWithoutSpace = 0;
Console.WriteLine(“Enter the your sentance”);
userSentance = Console.ReadLine();
//calling Extension Method WordCount
totalWords = userSentance.WordCount();
Console.WriteLine(“Total number of words is :”+ totalWords);
//calling Extension Method to count character
totalCharWithoutSpace = userSentance.TotalCharWithoutSpace();
Console.WriteLine(“Total number of character is :”+totalCharWithoutSpace);
Console.ReadKey();
}
}
}

Understanding the ‘using’ statement in C#
Introduction
This article is an introduction to the using statement in c# and also provides some insight into the actual implementation of the statement.
The Code
When you are using an object that encapsulates any resource, you have to make sure that when you are done with the object, the object’s Dispose method is called. This can be done more easily using the using statement in C#. The using statement simplifies the code that you have to write to create and then finally clean up the object. The using statement obtains the resource specified, executes the statements and finally calls the Disposemethod of the object to clean up the object. The following piece of code illustrates its use.
Hide Copy Code
using (TextWriter w = File.CreateText(“log.txt”))
{
w.WriteLine(“This is line one”);
}
Now that’s cool. But before we can start using this code, let us try to understand what happens behind the screen. Lets have a look at the IL code for the above code section.
Hide Copy Code
.locals init ([0] class [mscorlib]System.IO.TextWriter w)
IL_0000: ldstr “log.txt”
IL_0005: call class [mscorlib]System.IO.StreamWriter
[mscorlib]System.IO.File::CreateText(string)
IL_000a: stloc.0
.try
{
IL_000b: ldloc.0
IL_000c: ldstr “This is line one”
IL_0011: callvirt instance void [mscorlib]
System.IO.TextWriter::WriteLine(string)
IL_0016: leave.s IL_0022
} // end .try
finally
{
IL_0018: ldloc.0
IL_0019: brfalse.s IL_0021
IL_001b: ldloc.0
IL_001c: callvirt instance void [mscorlib]
System.IDisposable::Dispose()
IL_0021: endfinally
} // end handler
Hmmmm…. Well doesn’t look like this is my code. That’s because I see a try and a finally in the IL code
HTTP Modules
An HTTP module is an assembly that is called on every request that is made to your application. HTTP modules are called as part of the request pipeline and have access to life-cycle events throughout the request. HTTP modules therefore let you examine incoming requests and take action based on the request.
ASP.NET HTTP modules are like ISAPI filters because they are invoked for all requests. However, they are written in managed code and are fully integrated with the life cycle of an ASP.NET application. You can put custom module source code in the App_Code folder of your application, or you can put compiled custom modules as assemblies in the Bin folder of an application.
ASP.NET uses modules to implement various application features, which includes forms authentication, caching, session state, and client script services.
HTTP Handlers
An ASP.NET HTTP handler is the process that runs in response to a request that is made to an ASP.NET Web application. The most common handler is an ASP.NET page handler that processes .aspx files. When users request an .aspx file, the request is processed by the page handler.
The ASP.NET page handler is only one type of handler. ASP.NET includes several other built-in handlers such as the Web service handler for .asmx files.
C# | Boxing And Unboxing
Prerequisite : Data Types in C#
Boxing and unboxing is an important concept in C#. C# Type System contains three data types: Value Types (int, char, etc), Reference Types (object) and Pointer Types. Basically it convert a Value Type to a Reference Type, and vice versa. Boxing and Unboxing enables a unified view of the type system in which a value of any type can be treated as an object.
Boxing In C#
- The process of Converting a Value Type (char, int etc.) to a Reference Type(object) is called Boxing.
- Boxing is implicit conversion process in which object type (super type) is used.
- The Value type is always stored in Stack. The Referenced Type is stored in Heap.
- Example :
- int num = 23; // 23 will assigned to num
- Object Obj = num; // Boxing
- Description : First declare a value type variable (num), which is integer type and assigned it with value 23. Now create a references object type (obj) and applied Explicit operation which results in num value type to be copied and stored in object reference type obj as shown in below figure :

- Let’s understand Boxing with a C# programming code :
| // C# implementation to demonstrate // the Boxing using System; class GFG { // Main Method static public void Main() { // assigned int value // 2020 to num int num = 2020; // boxing object obj = num; // value of num to be change num = 100; System.Console.WriteLine (“Value – type value of num is : {0}”, num); System.Console.WriteLine (“Object – type value of obj is : {0}”, obj); } } |
- Copy CodeRun on IDE
- Output:
- Value – type value of num is : 100
- Object – type value of obj is : 2020
Unboxing In C#
- The process of converting reference type into the value type is known as Unboxing.
- It is explicit conversion process.
- Example :
- int num = 23; // value type is int and assigned value 23
- Object Obj = num; // Boxing
- int i = (int)Obj; // Unboxing
- Description : Declaration a value type variable (num), which is integer type and assigned with integer value 23. Now, create a reference object type (obj).The explicit operation for boxing create an value type integer i and applied casting method. Then the referenced type residing on Heap is copy to stack as shown in below figure :

- Let’s understand Unboxing with a C# programming code :
| // C# implementation to demonstrate // the Unboxing using System; class GFG { // Main Method static public void Main() { // assigned int value // 23 to num int num = 23; // boxing object obj = num; // unboxing int i = (int)obj; // Display result Console.WriteLine(“Value of ob object is : ” + obj); Console.WriteLine(“Value of i is : ” + i); } } |
- Copy CodeRun on IDE
- Output:
- Value of ob object is : 23
- Value of i is : 23
SINGLETON DESIGN PATTERN WITH INHERITENCE
Implementing the singleton pattern when you are using a single class is trivial using C#. The following chunk of code will accomplish that in a thread-safe manner.
class MySingleton
{
private static MySingleton instance = new MySingleton();
public static MySingleton Instance { get { return instance; } }
}
What happens though when you want to use singletons with inheritance (ie: each subclass needs to be a singleton as well)? This was the best I could come up with.
using System;
using System.Reflection;
abstract class MySingleton
{
private static MySingleton instance = null;
private static readonly object padlock = new object();
public static MySingleton GetInstance()
{
lock (padlock)
{
if (instance == null)
SetInstance(typeof(ChildSingleton));
return instance;
}
}
public static void SetInstance(MySingleton instance)
{
lock (padlock)
{
MySingleton.instance = instance;
}
}
public static void SetInstance(Type type)
{
if (type.IsSubclassOf(typeof(MySingleton)))
{
MethodInfo register = type.GetMethod(“Register”, BindingFlags.Public | BindingFlags.Static);
if (register == null)
throw new InvalidOperationException(“Instance must have a static Register method.”);
register.Invoke(null, null);
}
}
public virtual string Info { get { return this.GetType().FullName; } }
}
class ChildSingleton : MySingleton
{
private static ChildSingleton instance = new ChildSingleton();
private ChildSingleton()
{
}
public static void Register()
{
MySingleton.SetInstance(instance);
}
}
class OtherSingleton : MySingleton
{
private static OtherSingleton instance = new OtherSingleton();
private OtherSingleton()
{
}
public static void Register()
{
MySingleton.SetInstance(instance);
}
}
class EntryPoint
{
public static void Main(string[] args)
{
MySingleton singleton = MySingleton.GetInstance();
Console.WriteLine(singleton.Info);
MySingleton.SetInstance(typeof(OtherSingleton));
singleton = MySingleton.GetInstance();
Console.WriteLine(singleton.Info);
}
}
I’m using this pattern for a project that I have going where resource items can be stored in either a database or on the filesystem. While developing, I would prefer to not have to go through the hoops of updating the database everytime I make a small change to a resource item.
So, while developing, I would use the SetInstance method to initialize the singleton instance to a Type that can read from the file system. Once Im done, I change it back to initialize the singleton instance that can read from the database.
The only thing that kind of bugs me about this is the dependency of the Register method on the derived singletons, but I dont see any other way to do this.
IMPROVING WEB API PERFORMANCE
Use Parallel Programming in Web API
Web API logic mainly deals with 2 important functions – Post data to the server for inserting or updating, and Fetch data from the server. When we have thousands of records to fetch from server, the response time is very very high. This is because sometimes we will have to loop through the data-source, make several changes, and then send the data to the client. And, a simple foreach loop is a single threaded loop which processesthe data sequentially, one by one, to give the result set.
So, in this case, it is recommended to use parallel foreach loop while getting the data from the server. As the parallel foreach loop works in multi-threaded environment, the execution will be faster than foreach loop.
Execution Process of Parallel Foreach loop,
- List<Employee> li = new List<Employee>();
- li.Add(new Employee { Id = 1001, Name = “Sambid”, Company = “DELL”, Location = “Bangalore” });
- li.Add(new Employee { Id = 1002, Name = “Sumit”, Company = “DELL”, Location = “Bangalore” });
- li.Add(new Employee { Id = 1003, Name = “Koushal”, Company = “Infosys”, Location = “New Delhi” });
- li.Add(new Employee { Id = 1004, Name = “Kumar”, Company = “TCS”, Location = “Bangalore” });
- li.Add(new Employee { Id = 1005, Name = “Mohan”, Company = “Microsoft”, Location = “Hyderabad” });
- li.Add(new Employee { Id = 1006, Name = “Tushar”, Company = “Samsung”, Location = “Hyderabad” });
- li.Add(new Employee { Id = 1007, Name = “Jia”, Company = “TCS”, Location = “Pune” });
- li.Add(new Employee { Id = 1008, Name = “KIRAN”, Company = “CTS”, Location = “Bangalore” });
- li.Add(new Employee { Id = 1009, Name = “Rinku”, Company = “CGI”, Location = “Bangalore” });
And, here is the Employee class.
- public class Employee
- {
- public int Id { get; set; }
- public string Name { get; set; }
- public string Company { get; set; }
- public string Designation { get; set; }
- public string Location { get; set; }
- }
This is how we can use Parallel Foreach loop.
The loop will execute at once and give the result. In case of Foreach Loop, it gives results one by one. Suppose we have 1000 records in the result set, the loop will execute one by one 1000 times to give the result.
Note- Please don’t use the Parallel foreach loop while you have very little amount of records to fetch.

Use Asynchronous Programming to handle the concurrent HTTP requests
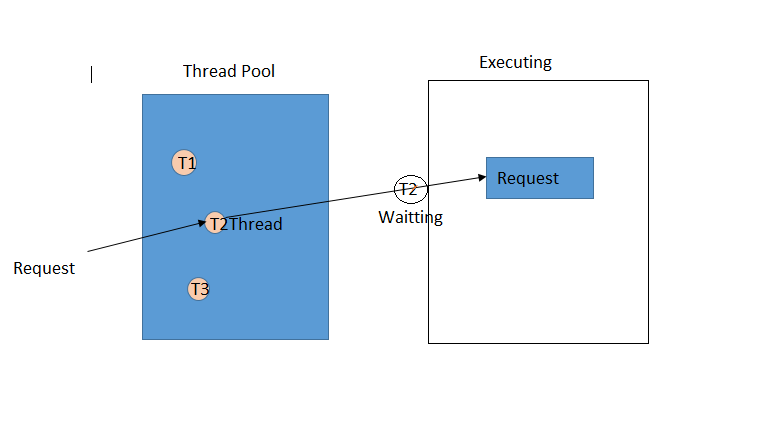
What happens in synchronous programming is that whenever a request comes for executing a Web API, a thread from Thread Pool is assigned to the request to execute. This thread is blocked until the process is executed and returns the result.
Here, the T2 thread remains blocked until it processes the request and returns the result, and if it encounters a long loop for execution, it takes a lot of time and waits till the end.
Suppose we have only 3 threads and all the threads have been assigned to three requests that have been waiting in the queue. In that situation, if 4th request comes as we have implemented it synchronously, it will give error because now it doesn’t have any thread to handle the request.
So, to handle more numbers of concurrent HTTP requests, we have to use Async Programming.
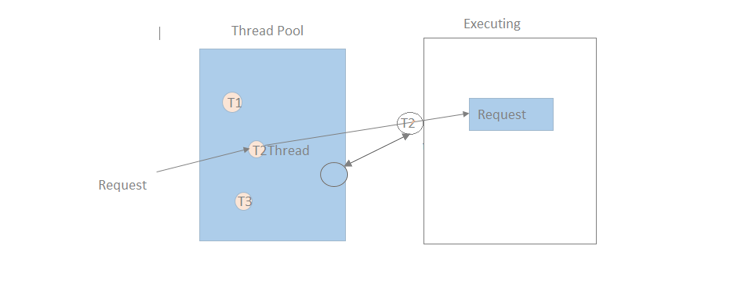
Asynchronous request handlers operate somewhat differently. When a request comes to the Web API Controller it takes one of its thread pool threads and assigns it to that request.
While the process will start executing, the thread will be returned to the thread pool. After finishing the execution, one more thread is allocated for the request to bringing the request.So, in this way, the thread will not wait until the completion of process execution and come back to the thread pool for handling another Request.
So, here I have given a small example of registration and how should we use Async programming in Web API.
- [AllowAnonymous]
- [Route(“Register”)]
- public async Task<IHttpActionResult> Register(RegisterBindingModel model)
- {
- Dictionary<object, object> dict = new Dictionary<object, object>();
- if (!ModelState.IsValid)
- {
- return BadRequest(ModelState);
- }
- var user = new ApplicationUser() { UserName = model.Email, Email = model.Email };
- IdentityResult result = await UserManager.CreateAsync(user, model.Password);
- if (result.Succeeded)
- {
- tbl_Users obj = new tbl_Users();
- obj.Active = false;
- obj.FirstName = model.FirstName;
- obj.LastName = model.LastName;
- obj.Email = model.Email;
- obj.UserId = user.Id;
- DefEntity.tbl_Users.Add(obj);
- if(DefEntity.SaveChanges()==1)
- {
- dict.Add(“Success”, “Data Saved Successfully.”);
- return Ok(dict);
- }
- else
- {
- return Content(HttpStatusCode.BadRequest, “User Details not Saved.”);
- }
- }
- else
- {
- return GetErrorResult(result);
- }
- }
Compress the Result of Web API
Web API compression is very important to improve ASP.NET Web API performance. In the Web, the data transfers through the network in packages (data packets), increasing the size of the data package, which will increase the size as well as increase the response time of the Web API. Thus, reducing the data packet size improves the load performance of Web API.
By compressing the API Response, we have the following two advantages.
- Data size will be reduced
- Response time will increase (increasing the speed of the communication between the Client and Server.)
We can compress web API through coading and through some setting in IIS.I have described the compression of Web API using coading in the following Links.
- Compressing Web API Response Using DotNetZip
- Compressing Web API Response
- Similarly, we can enable IIS compression by checking Dynamic Content Compression module.
So in this way we can compress the web API Response for achieving performance.

Using Caching to Improve Performance
Caching is a technique of storing frequently used data or information in a local memory, for a certain time period. So, next time, when the client requests the same information, instead of retrieving the information from the database, it will give the information from the local memory. The main advantage of caching is that it improves the performance by reducing the processing burden. We have several ways to implement Caching in web api .Here in the below link i have described one way to implement Caching.
- Implementing Caching In Web API
So here you will find how we can implement Caching in Web API and how it will help in improve the Performance.
Using High speed JSON Serializer
We frequently use JSON instead of XML for exchanging data between the service provider and the service clients. Primarily, we use this because JSON is light-weight.
In .NET, there are lots of serializers. The most popular is Json.NET which was chosen by Microsoft to be the default JSON serializer for Web API. Json.NET is great because it is fast, robust, and configurable.
There are several serializers which are faster than Json.Net .Some of them are mentioned below.
We can see that the Protobuf-Net and JIL are very fast serializers, so if we can implement these in place of Json.net then it will obviously improve the performance. Protocol Buffers, or Protobuf , is Google’s official serializer. To use JIL serializer in .Net i have written an article you can check this in the below link.

Create Proper DataBase Structure
To improve any application performance we should give focus on database structure. I can say that the database structure plays an important role in improving performance.These are few notes we should check while working on database.
- Try to make Normalized tables structure.
- Provide proper Indexing to all table so that searching result will be easy from the table.
- Relate all the interrelated table with Foreign Key and Primary Key.
I think we must follow at least these 3 rules while creating database Structure for improving performance.
Try TO Validate Certain Properties From Client Side
It is very good to validate certain model properties from Client Side rather then Server side. Once we put invalidated data without client side validation then it will go to the server and check if it is valid data or not. If it is not valid data then it will give error from server. So here we can check the round trip using client side validation. So it will be good if we can do the validation with what ever possible from client side like (Mobile devices,Web sites etc).
What’s a closure?
Closures are a key aspect of JavaScript that every developer should know about and understand. Today’s article merely skims the surface of closures, but will give you a good idea of what closures are and how they work in JavaScript. Lets jump in…
We’ll start by taking a peek at two textbook definitions of closure.
Definition #1:
A closure is a function that has access to the parent scope, even after the scope has closed.
Definition #2:
A closure is the combination of a function and the lexical environment within which that function was declared.
Great. But what do those actually mean?
First you need to understand scope in JavaScript. Scope is essentially the lifespan of a variable in JavaScript. You see, where a variable is defined plays a large role in how long that variable is around, and which functions in your program have access to it.
Lets look at an example.
When you create a function in JavaScript, it has access to variables created inside and outside the function.
Variables created inside a function are locally defined variables. A local variable can only be accessed within the function (scope) that it is defined in. In the example below, you’ll see that if we try to log the value of wordsoutside of the function we get a reference error. That’s because words is a locally scoped variable:
Contrast that to this example where we define words in the global scope. This means it’s accessible to every function in the document:
Nested Functions
What happens when we nest one function inside of another? I want you to follow along with this next example because this is where it gets fun!
If you’re using Google Chrome, open up your developer console with [WINDOWS]: Ctrl + Shift + J [MAC]: Cmd + Opt + J
Cool. Now copy and paste the below code into your console. All we’ve done is create a function named speak. speak returns a function named logIt. And finally all logIt does is log the value of words to the console, in this case that means it logs ‘hi’ to the console.
Once you’ve got that copied into your console, we’re going to create a variable and assign it to our speak function as so:
var sayHello = speak();
Now we can see what the value of sayHello is by calling the variable but not invoking the inner function:
sayHello;
// function logIt() {
// var words = ‘hi’;
// console.log(words);
// }
As expected, sayHello is referencing our returned inner function. This means that if we run sayHello() in the console, it will invoke and run the logIt()function:
sayHello();
// ‘hi’
It works! But this isn’t anything special. Let’s move one line of code and see what changes. Take a look at the example below. We’ve moved our declaration of the variable words outside of the inner function and into the speak() function:
Like before, lets declare a variable and assign it to our speak function:
var sayHello = speak();
Now we’ll take a look at what our sayHello variable is referencing:
sayHello
// function logIt() {
// console.log(words);
// }
Uh oh. There’s no words variable definition. So what’s going to happen when we invoke the function?
sayHello();
// ‘hi’
It still works! And that’s because you’ve just experienced the effects of a closure!
Confused? That’s ok. Think back to our closure definition:
A closure is a function that has access to the parent scope, even after the scope has closed.
In this case our speak() function’s scope has closed. This means the var words = ‘hi’ should also be gone. However, in JavaScript we have this cool little concept called closures: Our inner function maintains a reference to the scope in which it was created. This allows the logIt() function to still access the words variable — even after speak() has closed.
It’s important to note that every function in JavaScript has a closure. There’s nothing you need to explicitly do to a function to get this to work. It’s just a part of JavaScript.
Example #2
Lets examine another example. This one is a little more complex. Here’s the code:
We’ve got a function name that takes one parameter and returns an anonymous function that takes a different parameter. The result of the inner function returns a string.
Let’s create two invocations of the name function. For one we’ll pass in the name John, and the other, Cindy:
var j = name(‘John’);
var c = name(‘Cindy’);
Lets see exactly what j is referencing now:
j;
// function (a) {
// return `${n} likes ${a}`;
// }
Awesome. So we know from our previous example that because of closures, the function should still be able to access the n variable from the parent scope. All we need to do is pass in the value of a when invoking our function.
Lets try it out:
j(‘dogs’); // ‘John likes dogs’
c(‘cats’); // ‘Cindy likes cats’
It works! Because of closures we’re able to successfully execute our functions that reference variables from a previously closed scope.
***