1] Explain project Architecture?
3 Tier Architecture
MVC Architecture
2] Role and responsibility in your project?
Developer & TL
3] What is Abstraction and Interface?
Abstraction allows making relevant information visible and encapsulation enables a programmer to implement the desired level of abstraction. Abstraction can be achieved using abstract classes in C#. C# allows you to create abstract classes that are used to provide a partial class implementation of an interface
C# Interface:
An interface in C# contains only the declaration of the methods, and events, but not the implementation. It is left to the class that implements the interface by providing implementation for all the members of the interface. Interface makes it easy to maintain a program.
In C#, an interface can be defined using the interface keyword. For example, the following is a simple interface for a logging string message:
Interface Declaration:
interface ILog
{
void Log(string msgToLog);
}
Now, different classes can implement ILog by providing an implementation of the Log() method, for example, the ConsoleLog class logs the string on the console whereas FileLog logs the string into a text file.
Implement interface using <Class Name> : <Interface Name > syntax.
Implement Interface
class ConsoleLog: ILog
{
public void Log(string msgToPrint)
{
Console.WriteLine(msgToPrint);
}
}
class FileLog :ILog
{
public void Log(string msgToPrint)
{
File.AppendText(@”C:\Log.txt”).Write(msgToPrint);
}
}
Now, you can instantiate an object of either the ConsoleLog or FileLog class:
Instantiate Object
ILog log = new ConsoleLog();
//Or
ILog log = new FileLog();
Explicit Implementation:
You can implement interface explicitly by prefixing interface name with method name, as below:
Impliment Interface Explicitly
class ConsoleLog: ILog
{
public void ILog.Log(string msgToPrint) // explicit implementation
{
Console.WriteLine(msgToPrint);
}
}
Explicit implementation is useful when class is implementing multiple interface thereby it is more readable and eliminates the confusion. It is also useful if interfaces have same method name coincidently.
4] can you used Interface in your Project ? Explain the interface implementation in your project.
5] Explain generic and non generic
The basic difference is that generic collections are strongly typed and non-generic collections are not, unless they’ve been specially written to accept just a single type of data.
In the .NET Framework, the non-generic collections (ArrayList, Hashtable, SortedKist, Queue etc.) store elements internally in ‘object’ arrays which, can of course, store any type of data.
This means that, in the case of value types (int, double, bool, char etc), they have to be ‘boxed’ first and then ‘unboxed’ when you retrieve them which is quite a slow operation.
Whilst you don’t have this problem with reference types, you still have to cast them to their actual types before you can use them.
In contrast, generic collections (List<T>, Dictionary<T, U>, SortedList<T, U>, Queue<T> etc) store elements internally in arrays of their actual types and so no boxing or casting is ever required.
Generics in C#
Generics introduced in C# 2.0. Generics allow you to define a class with placeholders for the type of its fields, methods, parameters, etc. Generics replace these placeholders with some specific type at compile time.
A generic class can be defined using angle brackets <>. For example, the following is a simple generic class with a generic member variable, generic method and property.
Example: Generic class
class MyGenericClass<T>
{
private T genericMemberVariable;
public MyGenericClass(T value)
{
genericMemberVariable = value;
}
public T genericMethod(T genericParameter)
{
Console.WriteLine(“Parameter type: {0}, value: {1}”, typeof(T).ToString(),genericParameter);
Console.WriteLine(“Return type: {0}, value: {1}”, typeof(T).ToString(), genericMemberVariable);
return genericMemberVariable;
}
public T genericProperty { get; set; }
}
As you can see in the above code, MyGenericClass is defined with <T>. <> indicates that MyGenericClass is generic and the underlying type would be defined later, for now consider it as T. You can take any character or word instead of T.
Now, the compiler assigns the type based on the type passed by the caller when instantiating a class. For example, the following code uses the int data type:
Example: Instantiate Generic Class
MyGenericClass<int> intGenericClass = new MyGenericClass<int>(10);
int val = intGenericClass.genericMethod(200);
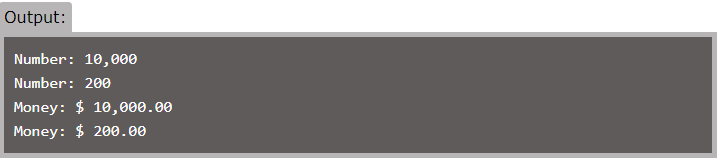
Output:
Parameter type: int, value: 200
Return type: int, value: 10
The following figure illustrates how the compiler will replace T with int in MyGenericClass.
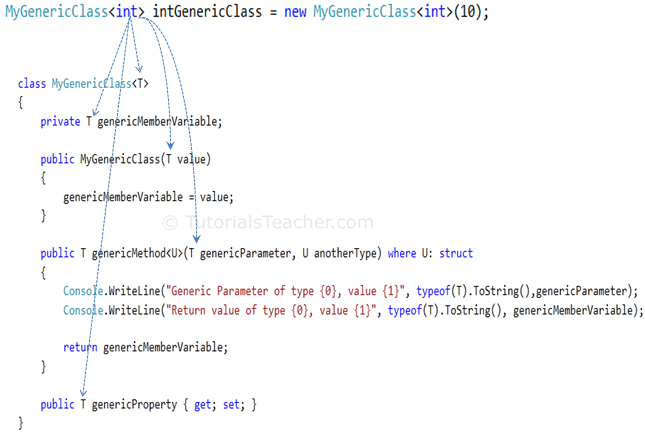
The above MyGenericClass<int> class would be compiled, as shown below.
Example: Compiled Generic class
class MyGenericClass
{
private int genericMemberVariable;
public MyGenericClass(int value)
{
genericMemberVariable = value;
}
public int genericMethod(int genericParameter)
{
Console.WriteLine(“Parameter type: {0}, value: {1}”, typeof(int).ToString(), genericParameter);
Console.WriteLine(“Return type: {0}, value: {1}”, typeof(int).ToString(), genericMemberVariable);
return genericMemberVariable;
}
public int genericProperty { get; set; }
}
You can use any type while instantiating a MyGenricClass. For example, the following example uses a string type.
Example: Generic class
MyGenericClass<string> strGenericClass = new MyGenericClass<string>(“Hello Generic World”);
strGenericClass.genericProperty = “This is a generic property example.”;
string result = strGenericClass.genericMethod(“Generic Parameter”);
Output:
Parameter type: string, value: Generic Parameter
Return type: string, value: Hello Generic World
Generic Class as Base Class
When deriving from a generic base class, you must provide a type argument instead of the base-class’s generic type parameter as shown below.
Example: Generic
class MyDerivedClass : MyGenericClass<string>
{
//implementation
}
If you want the derived class to be generic then no need to specify type for the generic base class.
Example: Generic derived class
class MyDerivedClass<U> : MyGenericClass<U>
{
//implementation
}
If the generic base class has constraints, the derived class must use the same constraints.
Example: Constraints
class MyGenericClass<T> where T: class
{
// Implementation
}
class MyDerivedClass<U> : MyGenericClass<U> where U: class
{
//implementation
}
Generic Delegates
As you have already learned in the previous section, the delegate defines the signature of the method which it can invoke. A generic delegate can be defined the same way as delegate but with generic type.
For example, consider the following generic delegate that takes two generic parameters.
Example: Generic Delegate
class Program
{
public delegate T add<T>(T param1, T param2);
static void Main(string[] args)
{
add<int> sum = AddNumber;
Console.WriteLine(sum(10, 20));
add<string> conct = Concate;
Console.WriteLine(conct(“Hello”,”World!!”));
}
public static int AddNumber(int val1, int val2)
{
return val1 + val2;
}
public static string Concate(string str1, string str2)
{
return str1 + str2;
}
}
Output:
30
Hello World!!
In the above example, add delegate is generic. In the Main() method, it has defined add delegate of int type variable sum. So it can point to the AddNumber() method which has int type parameters. Another variable of add delegate uses string type, so it can point to the Concate method. In this way, you can use generic delegates for different methods of different types of parameters.
Note:
A generic delegate can point to methods with different parameter types. However, the number of parameters should be the same.
Generics can be applied to the following:
- Interface
- Abstract class
- Class
- Method
- Static method
- Property
- Event
- Delegates
- Operator
Advantages of Generics
- Increases the reusability of the code.
- Generic are type safe. You get compile time errors if you try to use a different type of data than the one specified in the definition.
- Generic has a performance advantage because it removes the possibilities of boxing and unboxing.
5] Difference between Dictionary and HashTable?
The Dictionary class in C# represents a generic data structure that can contain keys and values of data. … The basic difference between a Hashtable andDictionary is that while the former is un-typed and requires boxing and un-boxing overhead, the latter doesn’t as it is typed.
6] Why dictionary is retrieval time faster than HashTable ?
Generic collections are faster than Non Generic collections, since type casting (Boxing) is happens in case of non generic collections.
7] Explain Boxing and Unboxing
Boxing is the process of converting a value type to the type object or to any interface type implemented by this value type. When the CLR boxes a value type, it wraps the value inside a System.Object and stores it on the managed heap.Unboxing extracts the value type from the object.
8] Explain MVC Routing
Routing in MVC
In the ASP.NET Web Forms application, every URL must match with a specific .aspx file. For example, a URL http://domain/studentsinfo.aspx must match with the file studentsinfo.aspx that contains code and markup for rendering a response to the browser.

ASP.NET introduced Routing to eliminate needs of mapping each URL with a physical file. Routing enable us to define URL pattern that maps to the request handler. This request handler can be a file or class. In ASP.NET Webform application, request handler is .aspx file and in MVC, it is Controller class and Action method. For example, http://domain/students can be mapped to http://domain/studentsinfo.aspx in ASP.NET Webforms and the same URL can be mapped to Student Controller and Index action method in MVC.
Route
Route defines the URL pattern and handler information. All the configured routes of an application stored in RouteTable and will be used by Routing engine to determine appropriate handler class or file for an incoming request.
The following figure illustrates the Routing process.

Configure a Route
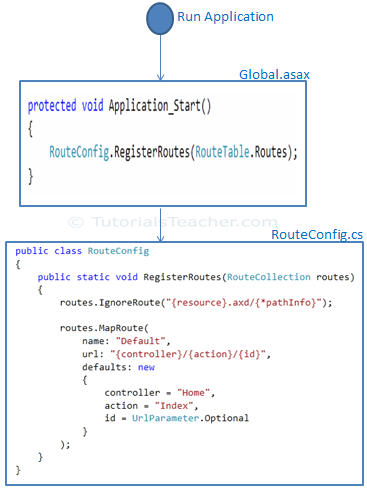
Every MVC application must configure (register) at least one route, which is configured by MVC framework by default. You can register a route in RouteConfig class, which is in RouteConfig.cs under App_Start folder. The following figure illustrates how to configure a Route in the RouteConfig class .

As you can see in the above figure, the route is configured using the MapRoute() extension method of RouteCollection, where name is “Default”, url pattern is “{controller}/{action}/{id}” and defaults parameter for controller, action method and id parameter. Defaults specifies which controller, action method or value of id parameter should be used if they do not exist in the incoming request URL.
The same way, you can configure other routes using MapRoute method of RouteCollection. This RouteCollection is actually a property of RouteTable class.
URL Pattern
The URL pattern is considered only after domain name part in the URL. For example, the URL pattern “{controller}/{action}/{id}” would look like localhost:1234/{controller}/{action}/{id}. Anything after “localhost:1234/” would be considered as controller name. The same way, anything after controller name would be considered as action name and then value of id parameter.

If the URL doesn’t contain anything after domain name then the default controller and action method will handle the request. For example, http://lcoalhost:1234 would be handled by HomeController and Index method as configured in the defaults parameter.
The following table shows which Controller, Action method and Id parameter would handle different URLs considering above default route.
| URL | Controller | Action | Id |
| http://localhost/home | HomeController | Index | null |
| http://localhost/home/index/123 | HomeController | Index | 123 |
| http://localhost/home/about | HomeController | About | null |
| http://localhost/home/contact | HomeController | Contact | null |
| http://localhost/student | StudentController | Index | null |
| http://localhost/student/edit/123 | StudentController | Edit | 123 |
Multiple Routes
You can also configure a custom route using MapRoute extension method. You need to provide at least two parameters in MapRoute, route name and url pattern. The Defaults parameter is optional.
You can register multiple custom routes with different names. Consider the following example where we register “Student” route.
Example: Custom Routes
public class RouteConfig
{
public static void RegisterRoutes(RouteCollection routes)
{
routes.IgnoreRoute(“{resource}.axd/{*pathInfo}”);
routes.MapRoute(
name: “Student”,
url: “students/{id}”,
defaults: new { controller = “Student”, action = “Index”}
);
routes.MapRoute(
name: “Default”,
url: “{controller}/{action}/{id}”,
defaults: new { controller = “Home”, action = “Index”, id = UrlParameter.Optional }
);
}
}
As shown in the above code, URL pattern for the Student route is students/{id}, which specifies that any URL that starts with domainName/students, must be handled by StudentController. Notice that we haven’t specified {action} in the URL pattern because we want every URL that starts with student should always use Index action of StudentController. We have specified default controller and action to handle any URL request which starts from domainname/students.
MVC framework evaluates each route in sequence. It starts with first configured route and if incoming url doesn’t satisfy the URL pattern of the route then it will evaluate second route and so on. In the above example, routing engine will evaluate Student route first and if incoming url doesn’t starts with /students then only it will consider second route which is default route.
The following table shows how different URLs will be mapped to Student route:
| URL | Controller | Action | Id |
| http://localhost/student/123 | StudentController | Index | 123 |
| http://localhost/student/index/123 | StudentController | Index | 123 |
| http://localhost/student?Id=123 | StudentController | Index | 123 |
Route Constraints
You can also apply restrictions on the value of parameter by configuring route constraints. For example, the following route applies a restriction on id parameter that the value of an id must be numeric.
Example: Route Constraints
routes.MapRoute(
name: “Student”,
url: “student/{id}/{name}/{standardId}”,
defaults: new { controller = “Student”, action = “Index”, id = UrlParameter.Optional, name = UrlParameter.Optional, standardId = UrlParameter.Optional },
constraints: new { id = @”\d+” }
);
So if you give non-numeric value for id parameter then that request will be handled by another route or, if there are no matching routes then “The resource could not be found” error will be thrown.
Register Routes
Now, after configuring all the routes in RouteConfig class, you need to register it in the Application_Start() event in the Global.asax. So that it includes all your routes into RouteTable.
Example: Route Registration
public class MvcApplication : System.Web.HttpApplication
{
protected void Application_Start()
{
RouteConfig.RegisterRoutes(RouteTable.Routes);
}
}
The following figure illustrate Route registration process.
Thus, routing plays important role in MVC framework.
9] Explain Attribute Routing
We all know that ASP.NET MVC is a great platform that allows us to create and manage web applications in a much simpler manner compared to form-based web applications. There are a few things in MVC based web applications that works a little differently than standard web applications, one of them is routing.
Until now, there has been a routing table that you can define either in the Global.asax or in the RouteConfig.cs and all incoming requests would look it up to decide the rendering of a target view.
Here is the code that you might have seen previously to have note-variable routes in MVC 4 in the following example of the Route collection object.
- routes.MapRoute(
- name: “Default”,
- url: “{controller}/{action}/{id}”,
- defaults: new { controller = “Product”, action = “List”, id = UrlParameter.Optional }
- );
The big question: what is the need for this new routing methodology?
And the answer is: there was nothing really wrong with the previous approach of routing and in fact you can still use it in MVC 5 or use this new routing method in conjunction with the old one.
First, we will need to enable attribute based routing on our MVC web application that can be done by only one line. All you need to do is put this line in the RegisterRoutes Method of the application.
- public static void RegisterRoutes(RouteCollection routes)
- {
- routes.IgnoreRoute(“{resource}.axd/{*pathInfo}”);
- tes.MapMvcAttributeRoutes(); //Enables Attribute Based Routing
- routes.MapRoute(
- name: “Default”,
- url: “{controller}/{action}/{id}”,
- defaults: new { controller = “Product”, action = “List”, id = UrlParameter.Optional }
- );
- }
Now, here is how you can use the attribute based routing on a specific action method.
- [Route(“products/{id?}”)]
- public ActionResult Details(string id)
- {
- if (string.IsNullOrEmpty(id))
- {
- return View(“List”, GetProductList());
- }
- return View(“Details”, GetProductDetails());
- }
As shown in the method above, the Route is defined on a Details action method that lets users access the product details page either by of these paths:
/Product/Details/Id or /products/id
You might have observed the question mark in the route above, all it indicates is that the id is an optional parameter of the route and hence the action method logic checks if the id is null. It will show you the product listing page.
Route Prefixes
Route Prefixes are nothing but the prefix for any route that we want to apply, all we need to do is to define the route prefix on a controller so that all the action methods inside it can follow the prefix.
For example:
- [RoutePrefix(“products”)]
- public class ProductController : Controller
- {
- //This will be translated to /products
- [Route]
- public ActionResult List()
- {
- return View();
- }
- //This will be translated to /products/2
- [Route(“{id?}”)]
- public ActionResult Details(string id)
- {
- if (string.IsNullOrEmpty(id))
- {
- return View(“List”);
- }
- return View(“Details”);
- }
- }
Route Constraints
Route constraints are nothing but a set of rules that you can define on your routing model / parameters that users need to follow when accessing the defined routes.
The way to define a constraint is by using the “:” character, let’s have a look at the example below.
For example:
- //route gets called as /products/productname
- [Route(“products/{id:alpha}”)]
- public ActionResult GetProduct(string name)
- {
- return View();
- }
- //route gets called as /products/2
- [Route(“products/{id:int}”)]
- public ActionResult GetProduct(int id)
- {
- return View();
- }
Now you might have observed in the example above that though the method name is the same the route’s parameter has some constraint on it. In other words the first method will be called if the route is accessed with a string as parameter and the second method will be called if the route is accessed with an integer in the route parameter.
You can also define your custom route constraints using an IRouteConstraint interface.
Route Areas
A Route area is nothing but the way to specify the area in a route, basically just to let the route know that the controller belongs to some area.
- [RouteArea(“business”)]
- [RoutePrefix(“products”)]
- public class ProductController : Controller
- {
- //This will be translated to /business/products/list
- [Route]
- public ActionResult List()
- {
- return View();
- }
- }
10] Why used attribute Routing
Here are a few advantages of attribute based routing:
- Helps developer in the debugging / troubleshooting mode by providing information about routes.
- Reduces the chances for errors, if a route is modified incorrectly in RouteConfig.cs then it may affect the entire application’s routing.
- May decouple controller and action names from route entirely.
- Easy to map two routes pointing to the same action.
11] Which routing used in your project? and why?
Answer by Experience
12] How to maintain session in MVC?
Introduction
ViewData and ViewBag are used for the same purpose — to transfer data from controller to view. ViewData is nothing but a dictionary of objects and it is accessible by string as key. ViewData is a property of controller that exposes an instance of the ViewDataDictionary class. ViewBag is very similar to ViewData. ViewBag is a dynamic property (dynamic keyword which is introduced in .net framework 4.0). ViewBag is able to set and get value dynamically and able to add any number of additional fields without converting it to strongly typed. ViewBag is just a wrapper around the ViewData.
ViewData Example
- //Controller Code
- public ActionResult Index()
- {
- List<string> Student = new List<string>();
- Student.Add(“Jignesh”);
- Student.Add(“Tejas”);
- Student.Add(“Rakesh”);
- ViewData[“Student”] = Student;
- return View();
- }
- //page code
- <ul>
- <% foreach (var student in ViewData[“Student”] as List<string>)
- { %>
- <li><%: student%></li>
- <% } %>
- </ul>
ViewBag Example
- //Controller Code
- public ActionResult Index()
- {
- List<string> Student = new List<string>();
- Student.Add(“Jignesh”);
- Student.Add(“Tejas”);
- Student.Add(“Rakesh”);
- ViewBag.Student = Student;
- return View();
- }
- //page code
- <ul>
- <% foreach (var student in ViewBag.Student)
- { %>
- <li><%: student%></li>
- <% } %>
- </ul>
TempData is a dictionary which is derived from TempDataDictionary class. TempData is stored data just like live session for short time. TempData keeps data for the time of HTTP Request, which means that it holds data between two consecutive requests. TempData helps us to transfer data between controllers or between actions. TempData internally use Session variables. Note that TempData is only work during the current and subsequent request. It is generally used to store one time messages. With the help of the TempData.Keep() method we can keep value in TempData object after request completion.
TempData Example
- //Controller Code
- public ActionResult Index()
- {
- List<string> Student = new List<string>();
- Student.Add(“Jignesh”);
- Student.Add(“Tejas”);
- Student.Add(“Rakesh”);
- TempData[“Student”] = Student;
- return View();
- }
- //page code
- <ul>
- <% foreach (var student in TempData[“Student”] as List<string>)
- { %>
- <li><%: student%></li>
- <% } %>
- </ul>
ViewData VS ViewBag VS TempData
| ViewData | ViewBag | TempData |
| It is Key-Value Dictionary collection | It is a type object | It is Key-Value Dictionary collection |
| ViewData is a dictionary object and it is property of ControllerBase class | ViewBag is Dynamic property of ControllerBase class. | TempData is a dictionary object and it is property of controllerBase class. |
| ViewData is Faster than ViewBag | ViewBag is slower than ViewData | NA |
| ViewData is introduced in MVC 1.0 and available in MVC 1.0 and above | ViewBag is introduced in MVC 3.0 and available in MVC 3.0 and above | TempData is also introduced in MVC1.0 and available in MVC 1.0 and above. |
| ViewData also works with .net framework 3.5 and above | ViewBag only works with .net framework 4.0 and above | TempData also works with .net framework 3.5 and above |
| Type Conversion code is required while enumerating | In depth, ViewBag is used dynamic, so there is no need to type conversion while enumerating. | Type Conversion code is required while enumerating |
| Its value becomes null if redirection has occurred. | Same as ViewData | TempData is used to pass data between two consecutive requests. |
| It lies only during the current request. | Same as ViewData | TempData only works during the current and subsequent request |
Session Example:
//adding data to session
//assuming the method below will return list of Products
var products=Db.GetProducts();
//Store the products to a session
Session[“products”]=products;
//To get what you have stored to a session
var products=Session[“products”] as List<Product>;
//to clear the session value
Session[“products”]=null;
13] What is TempData?
ASP.NET has numerous useful features and one of it is state management. ASP.NET Web Form developers have the habit of using Session objects for passing values across pages. Since in ASP.NET, everything is controlled by Page,the use of various state management techniques like ViewState, Cookies, Sessions, etc. play an important role here. But unlike ASP.NET Web Forms, in ASP.NET MVC the Controller decides what values are accepted from a view and which view to send the response to. The Controller in MVC is the major component for request processing and has its own lifecycle. Consider a scenario where one controller has an action method which returns the action method for another controller. During this controller transition, value entered from one controller needs to be used by another controller for some processing. In this case, it is mandatory for the developer to make use of some mechanism to maintain the state of the value across various controllers.
In MVC the following image explains the scenario:

Here the question is how to implement this? Since ASP.NET MVC builds on the top of the ASP.NET framework, we have access to the Session objects derived from HttpSessionBase. Like ASP.NET WebForms, in MVC the Sessionproperty is provided by HttpContext class. But MVC has its own TempData object which is used to pass data across controllers. This is derived from TempDataDictionary. The TempData has a very short life and sets itself to null when the target view is fully loaded. Here are some features of TempData and Session objects.
TempData:
- is the property of the ControllerBase class
- is used to pass data from one controller to other
- its life is ended when the target view is loaded completely
- it is recommended to type-cast the value when TempData value is used for processing
- Mostly used to store Validation Error Messages, etc.
The Life time of the TempData can be managed using the Keep() method.
Session:
- is used to pass data across controllers in MVC Application.
- Session data never expires.
Like TempData the value must be type-casted when it is used for processing.
Implementating TempData
Step 1: Download the free Visual Studio 2013 Community Edition (the article uses VS2013 Ultimate with Update 4) and create a new empty MVC application of the name MVC5_Sessions. In this project in App_Data folder add a new Sql Server database of the name Application. In this database add the following tables:
Category
| CREATE TABLE [dbo].[Category]( CategoryId int primary key Identity, CategoryName varchar(100) Not Null) |
Product
| CREATE TABLE [dbo].[Product]( ProductId INT NOT NULL PRIMARY KEY identity, ProductName varchar(100) Not Null, UnitPrice decimal Not Null, CategoryId int References Category (CategoryId)) |
Add some sample data in these tables.
Step 2: In the Models folder add a new ADO.NET Entity Data Model. In the wizard select the Application database we added in Step 1. Select all tables from the database. After completing the wizard, the following mapping will be displayed:

Using TempData to pass values across controllers
Step 3: In the Controllers add a new Empty MVC Controller of the name CategoryController .In this controller, we already have an Index method along with the add SerachProducts action method with HttpGet and HttpPost as below:
| using System.Linq;using System.Web.Mvc;using MVC5_Sessions.Models;namespace MVC5_Sessions.Controllers{public class CategoryController : Controller{ ApplicationEntities ctx; public CategoryController() { ctx = new ApplicationEntities(); } // GET: Category public ActionResult Index() { var cats = ctx.Categories.ToList(); return View(cats); } public ActionResult SearchProducts() { return View(); } [HttpPost] public ActionResult SearchProducts(Category c) { TempData[“Category”] = c; return RedirectToAction(“Index”,”Product”); }}} |
The above code has the SearchProducts action method for [HttpPost]. This method declares the TempData object with key as ‘Category’. This object is set to the Category object passed to the SearchProducts action method. The SearchProducts action method returns the Index method of the ProductController using the below statement:
| return RedirectToAction(“Index”,”Product”); |
Step 3: Scaffold Index.cshtml and SearchProducts.cshtml from the Index and Search Products action method. Change the SearchProducts.cshtml to the following:
@model MVC5_Sessions.Models.Category

@{
    ViewBag.Title = "SearchProducts";
}

<h2>SearchProducts</h2>
@using (Html.BeginForm())
{
    @Html.EditorFor(cat=>cat.CategoryId);
         <div class="form-group">
            <div class="col-md-offset-2 col-md-10">
                <input type="submit" value="Search" class="btn btn-default" />
            </div>
        </div>
}
The above view has a textbox which is bound with the CategoryId of the Category Model class.
Step 4: In the Controllers folder, add a new Empty MVC controller of the name ProductController and add the following code in it:
using System.Linq;
using System.Web.Mvc;
using MVC5_Sessions.Models;

namespace MVC5_Sessions.Controllers
{
    public class ProductController : Controller
    {
        ApplicationEntities ctx;
        public ProductController()
        {
            ctx = new ApplicationEntities();
        }
        // GET: Product
        /// <summary>
        /// Type Case the TempData to Category
        /// </summary>
        /// <returns></returns>
        public ActionResult Index()
        {
            if (TempData["Category"] != null)
            {
                var Cat = (Category)TempData["Category"];

                var Products = from p in ctx.Products
                               where p.CategoryId == Cat.CategoryId
                               select p;
                return View(Products.ToList());
            }
            else
            {
                return View(ctx.Products.ToList());
            }
        }

        [HttpPost]
        public ActionResult Index(int id=0)
        {
            var Data = TempData["Category"] as Category;

            return RedirectToAction("Index");
        }
    }
}
The above code has Index action methods for HttpGet and HttpPost. The HttpGet Index method accepts the TempData[“Category”] object and type casts it to Category. The code further queries the Products based upon the CategoryId and returns Products under the category.
Step 5: Scaffold the Index.cshtml from the Index action method and make the following changes in it:
| @model IEnumerable<MVC5_Sessions.Models.Product> @{ ViewBag.Title = “Index”;} <h2>Index</h2> <p> @Html.ActionLink(“Create New”, “Create”)</p><table class=”table”> <tr> <th> @Html.DisplayNameFor(model => model.ProductId) </th> <th> @Html.DisplayNameFor(model => model.ProductName) </th> <th> @Html.DisplayNameFor(model => model.UnitPrice) </th> <th> @Html.DisplayNameFor(model => model.Category.CategoryName) </th> <th></th> </tr> @foreach (var item in Model) { <tr> <td> @Html.DisplayFor(modelItem => item.ProductId) </td> <td> @Html.DisplayFor(modelItem => item.ProductName) </td> <td> @Html.DisplayFor(modelItem => item.UnitPrice) </td> <td> @Html.DisplayFor(modelItem => item.Category.CategoryName) </td> <td> @Html.ActionLink(“Edit”, “Edit”, new { id=item.ProductId }) | @Html.ActionLink(“Details”, “Details”, new { id=item.ProductId }) | @Html.ActionLink(“Delete”, “Delete”, new { id=item.ProductId }) </td> </tr>} </table> @using(Html.BeginForm()){ <input type=”submit” value=”Post” />} |
When the submit button is clicked, it posts to the Index action method with HttpPost. Apply breakpoint on the HttpPost Index action method to check the value in the TempData[“Category”] when the end-user posts to the Index view.
Run the Application and navigate to the SearchProducts action of the Category Controller: http://<server>/Category/SearchProducts
The following view will be displayed:
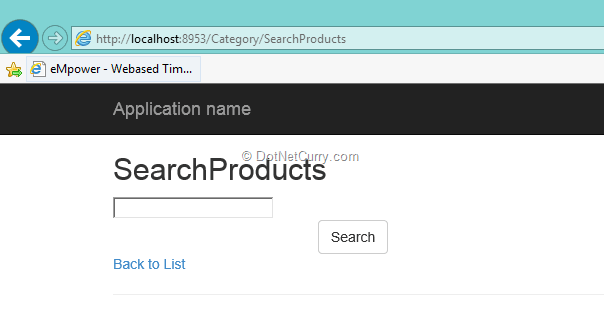
Enter CategoryId in the TextBox and click on the ‘Search’ button. The Product Index view will be displayed:
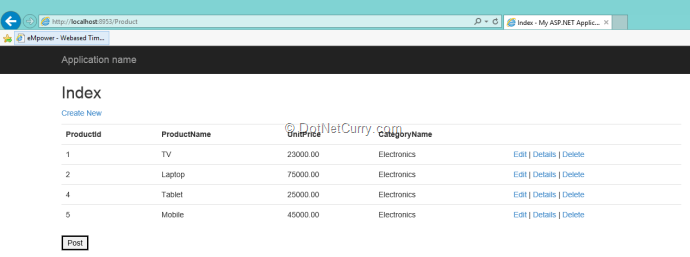
Click on the ‘Post’ button which will enter in the debug-mode to the HttpPost Index action method. We have already applied the breakpoint on this Index method. Here check the value of the TempData[“Category”]. It will display the values in the TempData[“Category”] as zero (0) and the data will be null as shown here:
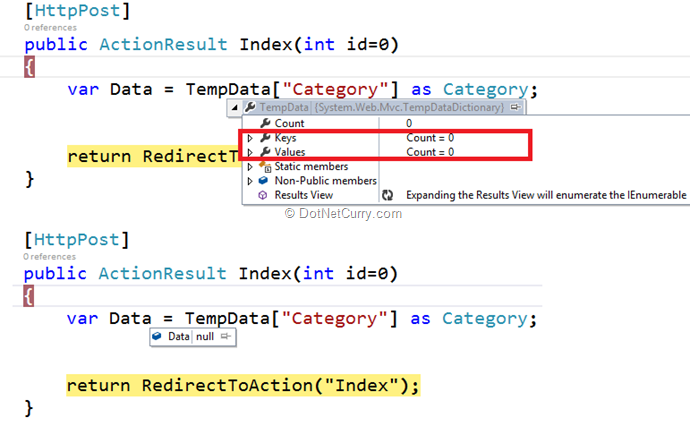
(Note: These are two different images showing debug from LHS and RHS of this expression)
The value from the TempData[“Category”] is null because the TempData gets killed when the response is completely loaded.
Step 6: To maintain the life of the TempData[“Category”], make the following change in the HttpGet Index Action method of the ProductController:
| public ActionResult Index(){ if (TempData[“Category”] != null) { var Cat = (Category)TempData[“Category”]; var Products = from p in ctx.Products where p.CategoryId == Cat.CategoryId select p; TempData.Keep(“Category”); return View(Products.ToList()); } else { return View(ctx.Products.ToList()); }} |
The TempData.Keep(“Category”) will maintain the state of the data now even when the response view is loaded.
Step 7: Repeat Step 5. You will see the TempData[“Category”] is maintained as shown here:

That’s it, in MVC we can make use of TempData to maintain the state of the values across the requests using which data can be passed across controllers.
Something very Important about TempData and Session
Since TempData makes use of the Session State behavior, it must be enabled on the controller using TempData. By default it is always enabled, however using code, the session state can be disabled on the controller. In the CategoryController class, add the following attribute:
| [SessionState(System.Web.SessionState.SessionStateBehavior.Disabled)]public class CategoryController : Controller{ |
The above code disables the session state on request processing. Run the application and navigate to the Category/SearchProducts View, enter CategoryId in the TextBox, and click on the ‘Search’ button. The following page gets displayed:

The above error clearly shows that ‘SessionStateTempDataProvider’ requires the Session State to be enabled.
The Same demo can be implemented using Session[“Category”] object to pass data across controllers.
Conclusion: While developing business applications using ASP.NET MVC, we may need to maintain the state of the data across requests. TempData is your friend in such scenarios.
14] Difference between ViewData and TempData
Explained above
15] what is layout page in MVC ?
Layout View
In this section, you will learn about the layout view in ASP.NET MVC.
An application may contain common parts in the UI which remains the same throughout the application such as the logo, header, left navigation bar, right bar or footer section. ASP.NET MVC introduced a Layout view which contains these common UI parts, so that we don’t have to write the same code in every page. The layout view is same as the master page of the ASP.NET webform application.
For example, an application UI may contain Header, Left menu bar, right bar and footer section that remains same in every page and only the centre section changes dynamically as shown below.

The layout view allows you to define a common site template, which can be inherited in multiple views to provide a consistent look and feel in multiple pages of an application. The layout view eliminates duplicate coding and enhances development speed and easy maintenance. The layout view for the above sample UI would contain a Header, Left Menu, Right bar and Footer sections. It contains a placeholder for the center section that changes dynamically as shown below.

The razor layout view has same extension as other views, .cshtml or .vbhtml. Layout views are shared with multiple views, so it must be stored in the Shared folder. For example, when we created our first MVC application in the previous section, it also created _Layout.cshtml in the Shared folder as shown below.

The following is an auto-generated _Layout.cshtml.
_Layout.cshtml:
<!DOCTYPE html>
<html>
<head>
<meta charset=”utf-8″ />
<meta name=”viewport” content=”width=device-width, initial-scale=1.0″>
<title>@ViewBag.Title – My ASP.NET Application</title>
@Styles.Render(“~/Content/css”)
@Scripts.Render(“~/bundles/modernizr”)
</head>
<body>
<div class=”navbar navbar-inverse navbar-fixed-top”>
<div class=”container”>
<div class=”navbar-header”>
<button type=”button” class=”navbar-toggle” data-toggle=”collapse” data-target=”.navbar-collapse”>
<span class=”icon-bar”></span>
<span class=”icon-bar”></span>
<span class=”icon-bar”></span>
</button>
@Html.ActionLink(“Application name”, “Index”, “Home”, new { area = “” }, new { @class = “navbar-brand” })
</div>
<div class=”navbar-collapse collapse”>
<ul class=”nav navbar-nav”>
<li>@Html.ActionLink(“Home”, “Index”, “Home”)</li>
<li>@Html.ActionLink(“About”, “About”, “Home”)</li>
<li>@Html.ActionLink(“Contact”, “Contact”, “Home”)</li>
</ul>
</div>
</div>
</div>
<div class=”container body-content”>
@RenderBody()
<hr />
<footer>
<p>© @DateTime.Now.Year – My ASP.NET Application</p>
</footer>
</div>
@Scripts.Render(“~/bundles/jquery”)
@Scripts.Render(“~/bundles/bootstrap”)
@RenderSection(“scripts”, required: false)
</body>
</html>
As you can see, the layout view contains html Doctype, head and body as normal html, the only difference is call to RenderBody() and RenderSection() methods. RenderBody acts like a placeholder for other views. For example, Index.cshtml in the home folder will be injected and rendered in the layout view, where the RenderBody() method is being called. You will learn about these rendering methods later in this section.
Use Layout View
You must be wondering that how would the View know which layout view to use?
You can set the layout view in multiple ways, by using _ViewStart.cshtml or setting up path of the layout page using Layout property in the individual view or specifying layout view name in the action method.
_ViewStart.cshtml
_ViewStart.cshtml is included in the Views folder by default. It sets up the default layout page for all the views in the folder and its subfolders using the Layout property. You can assign a valid path of any Layout page to the Layout property.
For example, the following _ViewStart.cshtml in the Views folder, sets the Layout property to “~/Views/Shared/_Layout.cshtml”. So now, _layout.cshtml would be layout view of all the views included in Views and its subfolders. So by default, all the views derived default layout page from _ViewStart.cshtml of Views folder.

_ViewStart.cshtml can also be included in sub folder of View folder to set the default layout page for all the views included in that particular subfolder only.
For example, the following _ViewStart.cshtml in Home folder, sets Layout property to _myLayoutPage.cshtml. So this _ViewStart.cshtml will influence all the views included in the Home folder only. So now, Index, About and Contact views will be rendered in _myLayoutPage.cshtml instead of default _Layout.cshml.

Setting Layout property in individual view
You can also override default layout page set by _ViewStart.cshtml by setting Layout property in each individual .cshtml view. For example, the following Index view use _myLayoutPage.cshtml even if _ViewStart.cshtml set _Layout.cshtml.
Index View:
@{
ViewBag.Title = “Home Page”;
Layout = “~/Views/Shared/_myLayoutPage.cshtml”;
}
<div class=”jumbotron”>
<h1>ASP.NET</h1>
<p class=”lead”>ASP.NET is a free web framework for building great Web sites and Web applications using HTML, CSS and JavaScript.</p>
<p><a href=”http://asp.net” class=”btn btn-primary btn-lg”>Learn more »</a></p>
</div>
<div class=”row”>
<div class=”col-md-4″>
<h2>Getting started</h2>
<p>
ASP.NET MVC gives you a powerful, patterns-based way to build dynamic websites that
enables a clean separation of concerns and gives you full control over markup
for enjoyable, agile development.
</p>
<p><a class=”btn btn-default” href=”http://go.microsoft.com/fwlink/?LinkId=301865″>Learn more »</a></p>
</div>
<div class=”col-md-4″>
<h2>Get more libraries</h2>
<p>NuGet is a free Visual Studio extension that makes it easy to add, remove, and update libraries and tools in Visual Studio projects.</p>
<p><a class=”btn btn-default” href=”http://go.microsoft.com/fwlink/?LinkId=301866″>Learn more »</a></p>
</div>
<div class=”col-md-4″>
<h2>Web Hosting</h2>
<p>You can easily find a web hosting company that offers the right mix of features and price for your applications.</p>
<p><a class=”btn btn-default” href=”http://go.microsoft.com/fwlink/?LinkId=301867″>Learn more »</a></p>
</div>
</div>
Specify Layout Page in ActionResult Method
You can also specify which layout page to use in while rendering view from action method using View() method.
The following example, View() method renders Index view using _myLayoutPage.cshtml.
Example: Specify Layout View in Action Method
public class HomeController : Controller
{
public ActionResult Index()
{
return View(“Index”, “_myLayoutPage”);
}
public ActionResult About()
{
return View();
}
public ActionResult Contact()
{
return View();
}
}
Rendering Methods
ASP.NET MVC layout view renders child views using the following methods.
| Method | Description |
| RenderBody() | Renders the portion of the child view that is not within a named section. Layout view must include RenderBody() method. |
| RenderSection(string name) | Renders a content of named section and specifies whether the section is required. RenderSection() is optional in Layout view. |
The following figure illustrates the use of RenderBody and RenderSection methods.

As you can see in the above figure, _Layout.cshtml includes RenderBody() method and RenderSection() method. RenderSection methods specify name of a section such as LeftSection, MiddleSection and RightSection in the above figure. Index.cshtml defines named section using @section where name of each section matches with the name specified in RenderSection method of _Layout.cshtml, such as @Section RightSection etc. At run time, the named sections of Index.cshtml such as LeftSection, RightSection and MiddleSection will be rendered at appropriate place where RenderSection method is called. Rest of the part of Index view, which is not in any of the named section will render where RenderBody() method is being called.
16] we need change only the small portion in every page then what we can do this in MVC ?
Partial view is special view which renders a portion of view content. It is just like a user control web form application.
17] same functionality we can done using View then why we need to used partial view?
Partial can be reusable in multiple views. It helps us to reduce code duplication.
18] What is Delegates?
C# – Delegate
A function can have one or more parameters of different data types, but what if you want to pass a function itself as a parameter? How does C# handle the callback functions or event handler? The answer is – delegate.
A delegate is like a pointer to a function. It is a reference type data type and it holds the reference of a method. All the delegates are implicitly derived from System.Delegateclass.
A delegate can be declared using delegate keyword followed by a function signature as shown below.

The following example declares a Print delegate.

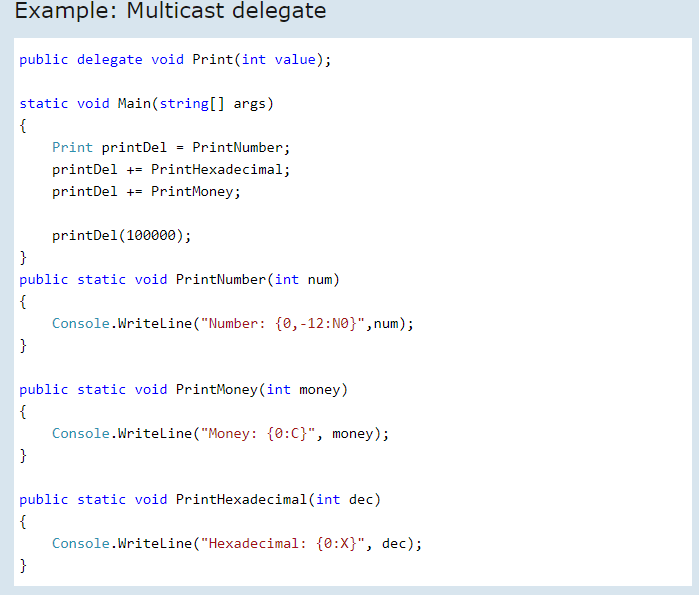
The Print delegate shown above, can be used to point to any method that has same return type & parameters declared with Print. Consider the following example that declares and uses Print delegate.

In the above example, we have declared Print delegate that accepts int type parameter and returns void. In the Main() method, a variable of Print type is declared and assigned a PrintNumber method name. Now, invoking Print delegate will in-turn invoke PrintNumber method. In the same way, if the Print delegate variable is assigned to the PrintMoney method, then it will invoke the PrintMoney method.
The following image illustrates the delegate.

Invoking Delegate
The delegate can be invoked like a method because it is a reference to a method. Invoking a delegate will in-turn invoke a method which id refered to. The delegate can be invoked by two ways: using () operator or using the Invoke() method of delegate as shown below.

Pass Delegate as a Parameter
A method can have a parameter of a delegate type and can invoke the delegate parameter.

In the above example, PrintHelper method has a delegate parameter of Print type and invokes it like a function:delegateFunc(numToPrint).
The following example shows how to use PrintHelper method that includes delegate type parameter.

Multicast Delegate
The delegate can points to multiple methods. A delegate that points multiple methods is called a multicast delegate. The “+” operator adds a function to the delegate object and the “-” operator removes an existing function from a delegate object.

Delegate is also used with Event, Anonymous method, Func delegate, Action delegate.

19] What are the filters in MVC?
In ASP.NET MVC, a user request is routed to the appropriate controller and action method. However, there may be circumstances where you want to execute some logic before or after an action method executes. ASP.NET MVC provides filters for this purpose.
ASP.NET MVC Filter is a custom class where you can write custom logic to execute before or after an action method executes. Filters can be applied to an action method or controller in a declarative or programmatic way. Declarative means by applying a filter attribute to an action method or controller class and programmatic means by implementing a corresponding interface.
MVC provides different types of filters. The following table list filter types, built-in filters for the type and interface which must be implemented to create a custom filter class.
| Filter Type | Description | Built-in Filter | Interface |
| Authorization filters | Performs authentication and authorizes before executing action method. | [Authorize], [RequireHttps] | IAuthorizationFilter |
| Action filters | Performs some operation before and after an action method executes. | IActionFilter | |
| Result filters | Performs some operation before or after the execution of view result. | [OutputCache] | IResultFilter |
| Exception filters | Performs some operation if there is an unhandled exception thrown during the execution of the ASP.NET MVC pipeline. | [HandleError] | IExceptionFilter |
To understand the filter in detail, let’s take an example of built-in Exception filter.
An exception filter executes when there is an unhandled exception occurs in your application. HandleErrorAttribute ([HandlerError]) class is a built-in exception filter class in MVC framework. This built-in HandleErrorAttribute class renders Error.cshtml included in the Shared folder by default, when an unhandled exception occurs.

The following example demonstrates built-in exception filter HandErrorAttribute.
Example: Authorization Filter
[HandleError]
public class HomeController : Controller
{
public ActionResult Index()
{
//throw exception for demo
throw new Exception(“This is unhandled exception”);
return View();
}
public ActionResult About()
{
return View();
}
public ActionResult Contact()
{
return View();
}
}
In the above example, we have applied [HandleError]attribute to HomeController. So now it will display Error page if any action method of HomeController would throw unhandled exception. Please note that unhandled exception is an exception which is not handled by the try-catch block.
Filters applied to the controller will automatically be applicable to all the action methods of a controller.
Please make sure that CustomError mode is on in System.web section of web.config, in order for HandleErrorAttribute work properly.
Example: SetCustomError in web.config
<customErrors mode=”On” />
Now, if you run the application. You would get following error page because we throw exception in Index action method for the demo purpose.

Thus, HandleError attribute will display common error page for any unhandled exception occurred in HomeController.
Register Filters
Filters can be applied at three levels.
1. Global Level
You can apply filters at global level in the Application_Start event of Global.asax.cs file by using default FilterConfig.RegisterGlobalFilters() mehtod. Global filters will be applied to all the controller and action methods of an application.
The [HandleError] filter is applied globaly in MVC Application by default in every MVC application created using Visual Studio as shown below.
Example: Register Global Filters
// MvcApplication class contains in Global.asax.cs file
public class MvcApplication : System.Web.HttpApplication
{
protected void Application_Start()
{
FilterConfig.RegisterGlobalFilters(GlobalFilters.Filters);
}
}
// FilterConfig.cs located in App_Start folder
public class FilterConfig
{
public static void RegisterGlobalFilters(GlobalFilterCollection filters)
{
filters.Add(new HandleErrorAttribute());
}
}
2. Controller level
Filters can also be applied to the controller class. So, filters will be applicable to all the action method of Controller class if it is applied to a controller class.
Example: Action Filters on Controller
[HandleError]
public class HomeController : Controller
{
public ActionResult Index()
{
return View();
}
}
3. Action method level
You can apply filters to an individual action method also. So, filter will be applicable to that particular action method only.
Example: Filters on Action Method
public class HomeController : Controller
{
[HandleError]
public ActionResult Index()
{
return View();
}
}
The same way, you can apply multiple built-in or custom filters globally or at controller or action method level for different purpose such as [Authorize],[RequireHttps], [ChildActionOnly],[OutputCache],[HandleError].
Filter Order
As mentioned above, MVC includes different types of filters and multiple filters can be applied to a single controller class or action method. So, filters run in the following order.
- Authorization filters
- Action filters
- Response filters
- Exception filters
Create Custom Filter
You can create custom filter attributes by implementing an appropriate filter interface for which you want to create a custom filter and also derive a FilterAttribute class so that you can use that class as an attribute.
For example, implement IExceptionFilter and FilterAttribute class to create custom exception filter. In the same way implement an IAuthorizatinFilter interface and FilterAttribute class to create a custom authorization filter.
Example: Custom Exception Filter
class MyErrorHandler : FilterAttribute, IExceptionFilter
{
public override void IExceptionFilter.OnException(ExceptionContext filterContext)
{
Log(filterContext.Exception);
base.OnException(filterContext);
}
private void Log(Exception exception)
{
//log exception here..
}
}
Alternatively, you can also derive a built-in filter class and override an appropriate method to extend the functionality of built-in filters.
Let’s create custom exception filter to log every unhandled exception by deriving built-in HandleErrorAttribute class and overriding OnException method as shown below.
Example: Custom Exception Filter
class MyErrorHandler : HandleErrorAttribute
{
public override void OnException(ExceptionContext filterContext)
{
Log(filterContext.Exception);
base.OnException(filterContext);
}
private void Log(Exception exception)
{
//log exception here..
}
}
Now, you can apply MyErrorHandler attribute at global level or controller or action method level, the same way we applied the HandleError attribute.
Example: Custom Action Filters to Controller
[MyErrorHandler]
public class HomeController : Controller
{
public ActionResult Index()
{
return View();
}
}
Points to Remember :
- MVC Filters are used to execute custom logic before or after executing action method.
- MVC Filter types:
- Authorization filters
- Action filters
- Result filters
- Exception filters
- Filters can be applied globally in FilterConfig class, at controller level or action method level.
- Custom filter class can be created by implementing FilterAttribute class and corresponding interface.
20] Explain All MVC Filter with Real scenario
Answer by experience
21] Explain Authentication Filter
Introduction
Authentication Filter is a new feature in MVC 5 this filter run before any other filter, this filter is used to authenticate User which was not there in older version [MVC 4] there we were using Authorization filter or Action filter to Authenticate User, now new updated of MVC 5 this cool feature is available.
Here in this article we are going to Create Custom Authentication Filter.
For Create Custom Authentication filter we need to inherit IAuthenticationFilter Interface.
This interface has 2 methods
- OnAuthentication
- OnAuthenticationChallenge
OnAuthentication: – In this method we are going to Authenticates the request.
OnAuthenticationChallenge: – this Method gets called when Authentication or Authorization is failed and this method is called after Execution of Action Method but before rendering of View.

After understanding what is Authentication Filter let’s create a project and see demo.
Create New Asp.Net MVC Application
From Visual studio 2015 IDE Start page click on “New Project” link.
After clicking on “New Project” link a new dialog will pop up.
In that we are going to select web templates from left pane after selecting web template, we find only one project template in it “ASP.NET Web Application” just select that.

After selecting this project template next we are going to name project as “MVC5DEMO7” and clicking on the OK button a new dialog will pop up with Name “New ASP.NET Project” for selecting project Templates.

In this dialog we are going to choose MVC project template and then we are going to choose Authentication type for doing that just click on Change Authentication button, a new dialog will pop up with name “Change Authentication” here we are going to choose No Authentication click on OK Button.
It will show progress bar while it is creating project.

After creating project it will show Readme html page with use links on that page.

After creating project first thing we are going add Filter folder in Project.
For adding Folder just right click on “MVC5DEMO7” and then select Add ➜ and inside that select “New Folder” and name it as Filters.

After adding Filters folder the next thing we are going add Authentication Filter in this folder to validate User is Logged in to application or not.
Adding Authentication Filter
Let’s Add Authentication Filter in for doing that just right click on Filters folder then select Add ➜ and inside that select Class a new dialog will pop up with name Add New Item with default Class template selected.

Then we are going to name class as UserAuthenticationFilter and finally click on Add Button.

Below is Code Snippet of UserAuthenticationFilter
After creating Filter next UserAuthenticationFilter will inherit a class FilterAttribute and IAuthenticationFilter.
And in this filter we are just going to check Session is IsNullOrEmpty if it is NULL or Empty then we are going to set Result to HttpUnauthorizedResult ();
And in OnAuthenticationChallenge method we are going check this result is not null or Result is HttpUnauthorizedResult.
If result is HttpUnauthorizedResult then we are going to redirect it to Error View.
using System;
using System.Collections.Generic;
using System.Linq;
using System.Web;
using System.Web.Mvc;
using System.Web.Mvc.Filters;
namespace MVC5DEMO7.Filters
{
public class UserAuthenticationFilter : ActionFilterAttribute, IAuthenticationFilter
{
public void OnAuthentication(AuthenticationContext filterContext)
{
//Check Session is Empty Then set as Result is HttpUnauthorizedResult
if (string.IsNullOrEmpty(Convert.ToString(filterContext.HttpContext.Session[“UserID”])))
{
filterContext.Result = new HttpUnauthorizedResult();
}
}
//Runs after the OnAuthentication method
//————//
//OnAuthenticationChallenge:- if Method gets called when Authentication or Authorization is
//failed and this method is called after
//Execution of Action Method but before rendering of View
//————//
public void OnAuthenticationChallenge(AuthenticationChallengeContext filterContext)
{
//We are checking Result is null or Result is HttpUnauthorizedResult
// if yes then we are Redirect to Error View
if (filterContext.Result == null || filterContext.Result is HttpUnauthorizedResult)
{
filterContext.Result = new ViewResult
{
ViewName = “Error”
};
}
}
}
}
After creating UserAuthenticationFilter in next step we are going to create a simple login page.
For doing that we have to create Model for login page right.
Adding LoginModel
We have created a Model in Models Folder with Name LoginModel it has 2 properties Username and Password.
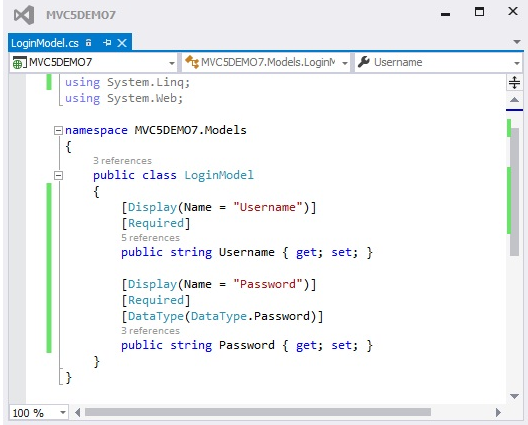
After adding LoginModel in next step we are going to add UserLogin Controller.
Adding UserLogin Controller
For adding UserLoginController just right on Controllers folder inside that select Add ➜ inside that select Controller after selecting Controller a new dialog with name “Add Scaffold” will pop up for choosing type of controller to add in that we are just going to select “MVC5Controller – Empty” and click on Add button, after that a new dialog with name “Add Controller” will pop up asking for Controller name here we are going to name controller as UserLoginController and click on Add button.

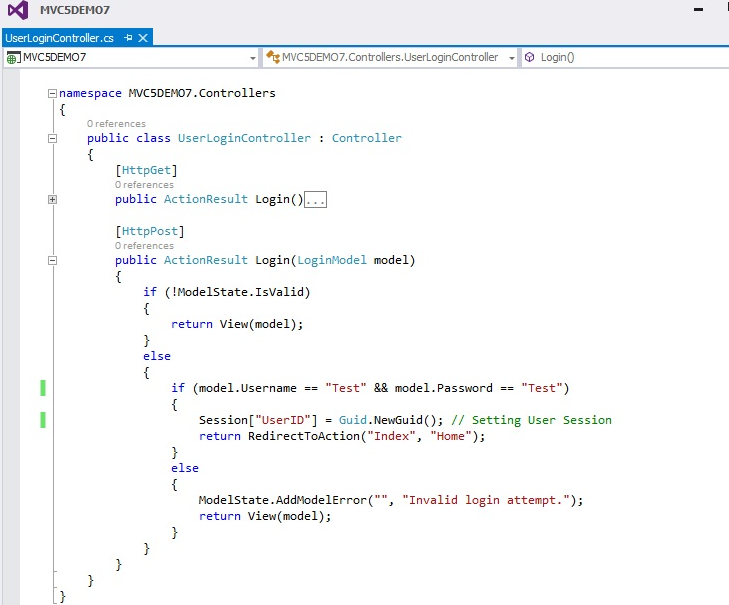
After adding UserLogin Controller in next step we are going to add 2 Action Method one which handles HttpGet Request and other which handle HttpPost Request.
In Post Request we are checking ModelState is valid or not if not then we are return model to View which show error on View.
If it is valid then we are going to check Username and Password is valid or not for this demo I have hardcoded values.
The Username to “Test” and Password to “Test” and if enter Username and Password is equal then we set Session[“UserID”] and redirect to Index View of Home Controller.
See below Snapshot of UserLogin Controller
Note:- Home controller comes by Default when you create Application.
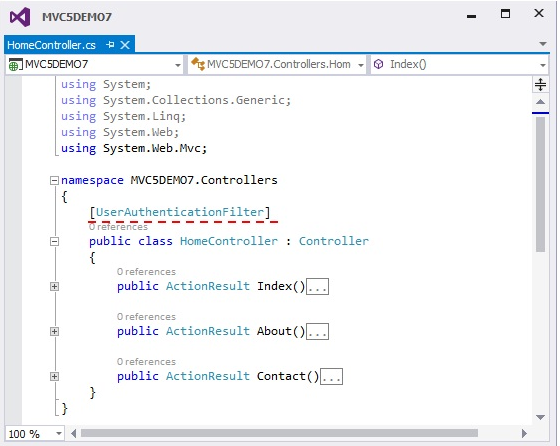
After adding UserLoginController in next step we are going to add apply UserAuthentication Filter on HomeController.
Applying UserAuthentication Filter on Home Controller
In this part we have applied UserAuthentication Filter on Home Controller.
Now if User is logged with valid credentials into application then only will be able to access Home Controller, because we have applied UserAuthentication Filter on Home Controller.
Now let’s save this application and run.
Next we are going to access Index Action Method of HomeController.
URL: http://localhost:####/home/index

Wow we do not have access to this page it is redirecting to Error View because we have applied UserAuthentication Filter on it.
Next we are going to access Login Action Method of UserLoginController.
URL: http://localhost:####/UserLogin/login
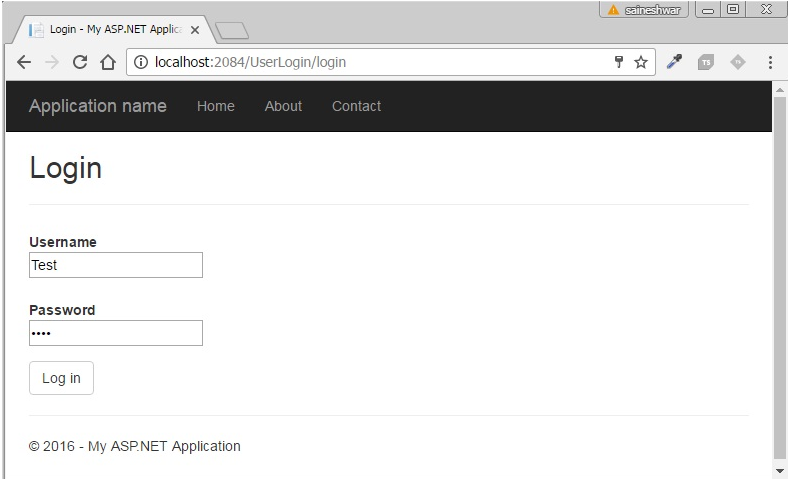
After entering Valid Credentials click on Log in button to Log into Application.
Debugging of UserAuthentication filter
Below is debug mode of UserAuthentication Filter where you can see real time values and how Authentication filter works.


After entering Valid Credentials we have passed Authentication check and we have been redirected to HomeController as show below.

If we enter Invalid Credentials then we cannot Login and if we cannot login then we cannot access Home controller.

Final we have completed understanding Authentication Filter a New feature in MVC 5 I hope you have enjoyed in this reading this article.
22] Which Authentication used in your project and Explain
Cookie based Authentication and Data based Authorization
23] Explain Exception Filter
Explained above
24] How to catch exception in exception filter
Exception handling in ASP.NET MVC (6 methods explained)
Introduction
In this Asp.net MVC step by step article we have discuss 6 ways of handling exceptions in ASP.NET MVC.In this article we also talk about best practices of MVC exception handling.

Method 1:- Simple way
The simplestwayis to use the traditional .NET exception handling style i.e. try and catch block. Now when exception happens catch block gets executed and it redirects to the error view.
But if we use this method then we will not be utilizing MVC exception mechanismproperly and completely. In the further sections we will discuss five important ways by which we can utilize MVC provided features for exception handling.
Hide Copy Code
public ActionResult SomeError()
{
try
{}
catch(Exception ex)
{return View(“Error”);}
}
Method 2:- Override “OnException” method
In this method we can override the “OnException” event of the controller and set the “Result” to the view name. This view gets invoked when error occurs in this controller. In the below code you can see we have set the “Result” to a view named as “Error”.
We have also set the exception so that it can be displayed inside the view.
Hide Copy Code
public class HomeController : Controller
{
protected override void OnException(ExceptionContext filterContext)
{
Exception ex = filterContext.Exception;
filterContext.ExceptionHandled = true;
var model = new HandleErrorInfo(filterContext.Exception, “Controller”,”Action”);
filterContext.Result = new ViewResult()
{
ViewName = “Error”,
ViewData = new ViewDataDictionary(model)
};
}
}
To display the above error in view we can use the below code:-
Hide Copy Code
@Model.Exception;
The problem with this approach is we cannot reuse the error handling logic across multiple controllers.
Method 3:- Using “HandleError” Attribute
The other way of handling error is my using “HandleError” attribute. Implementing “HandleError” attribute is a two-step process:-
Step 1 :- We need to first decorate the action method with “HandleError” attribute as shown in the below code.
Hide Copy Code
public class HomeController : Controller
{
[HandleError()]
public ActionResult SomeError()
{
throw new Exception(“test”);
}
}
Step 2:- In the “Web.config” file you need to add the “customErrors” tag and point to the “Error” view as shown in the below “Web.config” code snippet.
Hide Copy Code
<system.web>
<customErrors defaultRedirect=”Error.cshtml” mode=”On”>
</customErrors>
</system.web>
In case you want different error views for different exception types you can decorate action method with multiple “HandleError” attribute point to multiple views as per exception types.
Hide Copy Code
public class HomeController : Controller
{
[HandleError(ExceptionType=typeof(ArithmeticException),View=”Arthimetic”)]
[HandleError(ExceptionType = typeof(NotImplementedException),View =”Error1″)]
public ActionResult SomeError()
{
}
}
Method 4:- Inheriting from “HandleErrorAttribute”
One of the biggest drawbacks of all the previous method was reusability. Error handling logic cannot be reused across other controllers.
In order to reuse error handling logic across controller we can inherit from “HandleErrorAttribute”class anddecorate this class as attribute across controller.
Hide Copy Code
public class Err : HandleErrorAttribute
{
public override void OnException(ExceptionContext filterContext)
{
Exception ex = filterContext.Exception;
filterContext.ExceptionHandled = true;
var model = new HandleErrorInfo(filterContext.Exception, “Controller”, “Action”);
filterContext.Result = new ViewResult()
{
ViewName = “Error1”,
ViewData = new ViewDataDictionary(model)
};
}
}
Method 5:- Handling HTTP errors
All MVC exception handling techniques discussed till now do not handle HTTP errors like file not found, HTTP 500 error’s etc. For that we need to make an entry of the error action and the error status code as shown in the below config file.
Hide Copy Code
<system.web>
<customErrors
mode=”On” defaultRedirect=”Error1″>
<error statusCode=”404″ redirect=”~/Testing/NoPageFound”/>
</customErrors>
</system.web>
Method 6:- Global Error handling in MVC
If you wish to do global error handling across your application you can override the “Application_Error” event and do a response.redirect from the global error event. So if the error handling is not done at the controller level it will get propagated to “Global.asax” file.
Hide Copy Code
public class MvcApplication : System.Web.HttpApplication
{
protected void Application_Error(object sender, EventArgs e)
{
Exception exception = Server.GetLastError();
Server.ClearError();
Response.Redirect(“/Home/Error”);
}
}
What’s the best practice ?
The best is combination of “Method 4” and “Method 6”. Create error handling classeswhich inherit from “HandleErrorAttribute” class and decorate them respectively on controllers and action methods. So this takes care of errors happening on controllers and actions.
As a safety enable Global error handling as a fallback for any unexpected and unhandled errors byusing “Application_Error” event as described in “Method 6”.
25] What is web API? Why used in your project?
Refer MVC Notes
26] Explain API Controller Exception handling done your project?
Log4Net Logging
27] What is API return types?
A Web API 2 action method return types can be any of the following :

Void
When an ASP.NET Web API return type is void, it will return an empty HTTP response.
In the following example a web API with void return:
Example
public class SampleController : ApiController
{
public void Post()
{
}
}
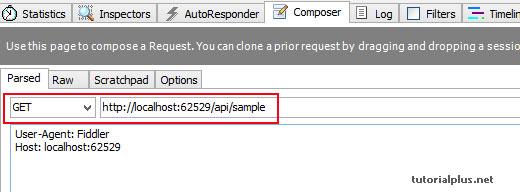
Note: We are using fiddler to call Web API, it is a free web debugging proxy which logs all HTTP(s) traffic between your computer and the Internet
Result
Calling sample web API in fiddler
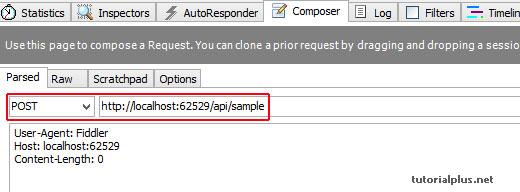
It is returning status code 204 No Content (an empty HTTP response)

HttpResponseMessage
- When Web API return type is HttpResponseMessage, Web API converts the return value directly into an HTTP response message.
- We can set the status code, content as per our requirement.
In the following example a web API with HttpResponseMessage return:
Example
public HttpResponseMessage Get()
{
HttpResponseMessage response = Request.CreateResponse(HttpStatusCode.OK, “value1”);
return response;
}
Result
Calling sample Web API with HTTP GET request
In Response, It is returning status code 200 OK and Content

Note:Web API serialized model into the response body based on request header formatter
In the following example a web API return HttpResponseMessage with list of Countries in response body:
Example
public HttpResponseMessage Get()
{
// list of Countries
List<Country> Countries = new List<Country>();
Country country = new Country();
country.ID = 1;
country.CountryName = “USA”;
country.Capital = “Washington”;
Countries.Add(country);
//Countries to the response body.
HttpResponseMessage response = Request.CreateResponse(HttpStatusCode.OK, Countries);
return response;
}
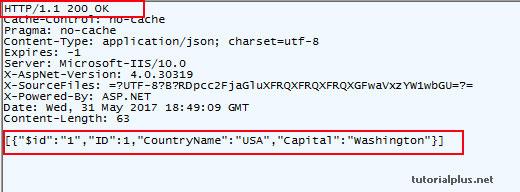
Result
In Response, It is returning status code 200 OK and Content
IHttpActionResult
IHttpActionResult is introduced in Web API 2, IHttpActionResult interface acts like a factory for HttpResponseMessage.
There are some advantages of using the IHttpActionResult over HttpResponseMessage
- The code is cleaner and easier to read
- Unit testing for controller action methods become easy
- It comes with custom built in responses
- Ok
- NotFound
- Exception
- Unauthorized
- BadRequest
- Conflict
- Redirect
In the following example a web API return IHttpActionResult with list of Countries in response body:
Example
public IHttpActionResult Get(int id)
{
// list of Countries
List<Country> Countries = new List<Country>();
Country country = new Country();
country.ID = 1;
country.CountryName = “USA”;
country.Capital = “Washington”;
Countries.Add(country);
//finding country based on provided id
var result = Countries.FirstOrDefault(x=> x.ID ==id);
if (result == null)
{
//create a 404 (Not Found) response
return NotFound();
}
else
{
//creates a 200 (OK) response that contains the country
return Ok(result);
}
}
Result
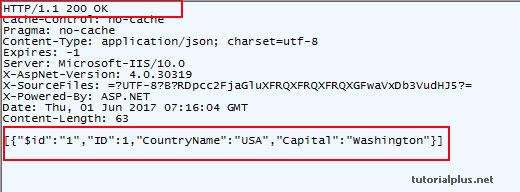
Calling sample web API with HTTP GET request and id

In Response, It is returning status code 200 OK and Content
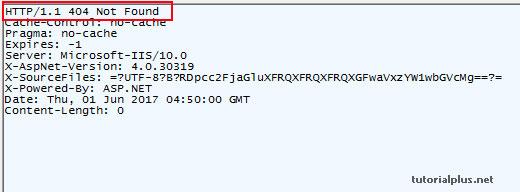
Calling sample web API with HTTP GET request and id(which is not exist)

In Response, It is returning status code 404 Not Found
Other type or Complex type
- A Web API can return other or custom complex type
- Web API serialize value and return it into the response body
- The response status code 200 OK
- But in this approach we cannot directly return an error code, still we can throw an HttpResponseException for error codes
In the following example a web API with Complex return type:
Example
public class CountryController : ApiController
{
public IEnumerable<Country> Get()
{
List<Country> Countries = new List<Country>();
Country country = new Country();
country.ID = 1;
country.CountryName = “USA”;
country.Capital = “Washington”;
Countries.Add(country);
return Countries;
}
}
Result
Calling Country web API with HTTP GET request

In Response, It is returning status code 200 OK and Content
28] How to set (JSON , XML , JPEG) responce type in API ?
Introduction
In this article we will discuss about Web API and its return types. Here is the agenda of this article:
- What is Web API.
- What are advantages of Web API(against WCF).
- Demo Web API with CRUD operation.
- Send result in different formats like XML, Json.
What is Web API
ASP.NET Web API is a framework which is used to make it easy to build HTTP services that reach a broad range of clients, including browsers and mobile devices. ASP.NET Web API is an ideal platform for building RESTful applications on the .NET Framework.
Moreover Web API is open source and an ideal platform for building REST-ful services over the .NET framework. It uses HTTP methods mainly GET, POST, PUT, DELETE to communicate with client. Unlike WCF Rest service, it use the complete features of HTTP (like URIs, request/response headers, caching, versioning, various content formats) and you don’t need to define any extra config settings for different devices unlike WCF Rest service.
We already have WCF, then why Web API?
If there is a requirement to develop a web service and it is not related to transaction, SOAP based, TCP, NamedPipe, MSMQ protocol and two-way communication (duplex) then Web API is best.
It doesn’t have complex and tedious configuration in WCF REST service. It is only based on HTTP and easy to define, expose and consume in a REST-ful way. It is light weight architecture and good for latest devices which have limited bandwidth like smart phones, tablets etc. It is open source.
It has automatic support for OData. Hence by placing the new [Queryable] attribute on a controller method that returns IQueryable, clients can use the method for OData query composition. It can be hosted within the application or on IIS.
It also supports the MVC features such as routing, controllers, action results, filter, model binders, IOC container or dependency injection that makes it more simple and robust.
Web API Demo with CRUD operation
In this section we will go through couple of steps how to create Web API and perform CRUD operation.
Step 1
Open Visual Studio – Go to File Menu, Select Add, then choose “New Project”. After choosing new project the following(Figure1) popup box appears. It shows different types of projects like Web, Windows, Console or MVC, you need to choose “ASP.NET MVC 4 Web Application” .

Figure 1: Add New MVC project
Step 2
Once you choose MVC project, you need to select MVC project type. So, select Web API project.
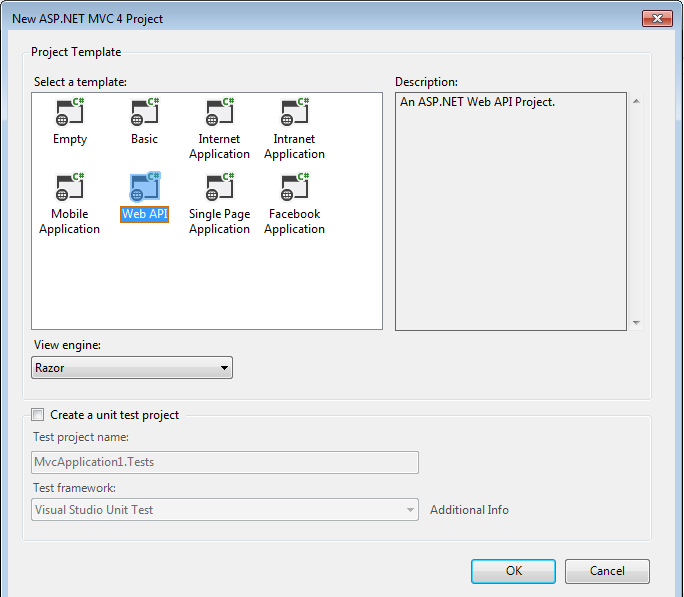
Figure 2: Choose Web API project
Step 3(Model)
Add Blog class to Models folder. Blog class contains 3 properties Id, Name and Url. Before starting coding I want to discuss what we are going to do. Web API will contain blog information and client will send AJAX request to API to get information about blog.
- public class Blog
- {
- public int Id { get; set; }
- public string Name { get; set; }
- public string Url { get; set; }
- }
Step 4(Controller)
After adding Web API project, you need to add one controller. Just right click on Controllers folder and Add Controller (See figure 3).
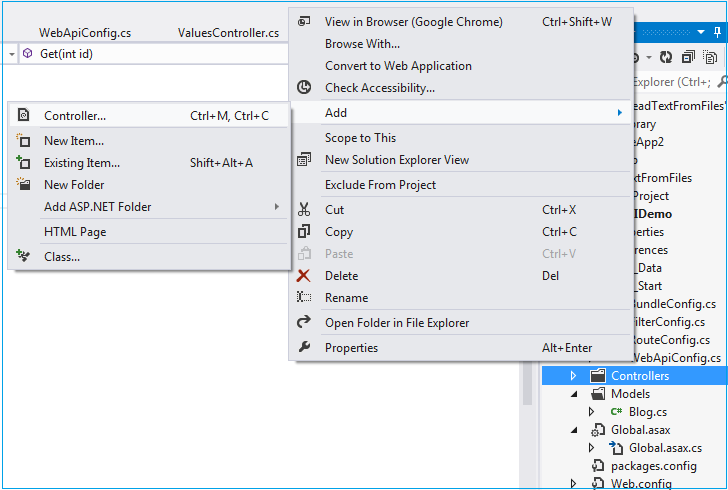
Figure 3: Add New Controller
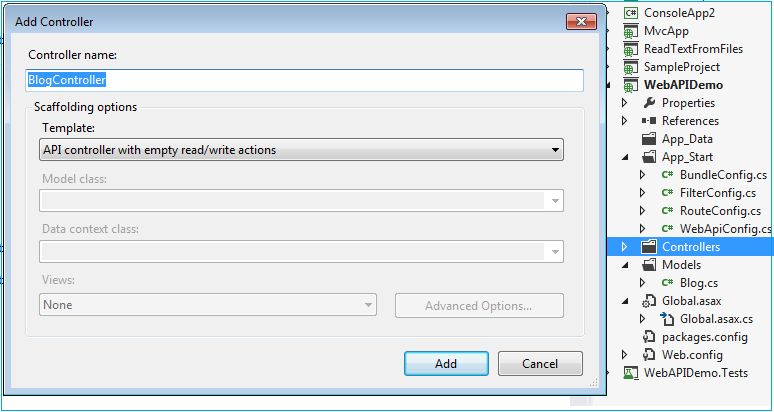
Figure 4: Choose proper template for Controller
Here BlogController class is inherited from ApiController. It contains methods Get() to get all records, Post() to add record, Get(int id) to search record, put() to update record and delete record. Those methods will be called from Client application through AJAX request. It is using a demo blogList(static variable) which contains couple of Blog Object but in real-life you will use EntityFramework or ADO.NET. Here is the complete code for controller:
- public class BlogController : ApiController
- {
- public static List<Blog> blogList = new List<Blog>()
- {
- new Blog { Id = 1, Name=”C-SharpCorner”, Url=”http://www.c-sharpcorner.com/”},
- new Blog { Id = 2, Name=”CodeProject”, Url=”http://www.codeproject.com”},
- new Blog { Id = 3, Name=”StackOverflow”, Url=”http://stackoverflow.com/”},
- };
- // GET api/default1
- public List<Blog> Get()
- {
- return blogList;
- }
- // GET api/blog/5
- public Blog Get(int id)
- {
- Blog blogObject = (from blog in blogList
- where blog.Id == id
- select blog).SingleOrDefault();
- return blogObject;
- }
- // POST api/blog
- public List<Blog> Post(Blog blogObj)
- {
- blogList.Add(blogObj);
- return blogList;
- }
- // PUT api/blog/5
- public void Put(Blog blogObj)
- {
- Blog blogOrignalObject = (from blog in blogList
- where blog.Id == blogObj.Id
- select blog).SingleOrDefault();
- blogOrignalObject.Name = blogObj.Name;
- blogOrignalObject.Url = blogObj.Url;
- }
- // DELETE api/blog/5
- public void Delete(int id)
- {
- blogList.RemoveAll(temp => temp.Id == id);
- }
- }
Step 5(View)
We will design view page where we will call Web API and display data returns by API. Here we will perform CRUD (Create, Read, Update, Delete) operations.
- <div>
- <h2>All Blogs</h2>
- <table border=”1″ cellpadding=”0″ cellspacing=”0″ id=”blogs”>
- <tr>
- <th>Id</th>
- <th>Name</th>
- <th>Url</th>
- </tr>
- </table>
- </div>
- <div>
- <h2>Search by ID</h2>
- <input type=”text” id=”blogId” size=”5″ />
- <input type=”button” value=”SearchBlog” onclick=”find();” />
- <p id=”blog” />
- <h1>Add Blog</h1>
- Id:
- <input type=”text” id=”Id” /><br />
- Name:
- <input type=”text” id=”Name” /><br />
- Url:
- <input type=”text” id=”Url” /><br />
- <input type=”button” value=”AddBlog” onclick=”add();” />
- </div>
Preceding code contains a table to display data, search record and add record. AJAX request will record to controls. Here is the complete code for AJAX request:
- <script src=”http://ajax.aspnetcdn.com/ajax/jQuery/jquery-2.0.3.min.js”></script>
- <script>
- $(document).ready(function () {
- // Send an AJAX request
- $.ajax({
- url: ‘http://localhost:1312/api/Blog?type=json’,
- type: “GET”,
- data: {},
- dataType: “json”,
- success: function (result) {
- // On success, ‘data’ contains a list of products.
- var htmlContent = “”;
- $.each(result, function (key, item) {
- htmlContent = htmlContent + “<tr><td>” + item.Id + “</td><td>” + item.Name + “</td><td>” + item.Url + “</td></tr>”;
- });
- // Appending HTML content
- $(‘#blogs’).append(htmlContent);
- },
- error: function (err) {
- alert(err.statusText);
- }
- });
- });
- // Adding Blog record
- function add() {
- var Id = $(‘#Id’).val();
- var Name = $(‘#Name’).val();
- var Url = $(‘#Url’).val();
- var blogData = { “Id”: Id, “Name”: Name, “Url”: Url };
- $.ajax({
- url: ‘http://localhost:1312/api/Blog?type=json’,
- type: “POST”,
- contentType: “application/json”,
- data: JSON.stringify(blogData),
- dataType: “json”,
- success: function (result) {
- // On success, ‘data’ contains a list of products.
- var htmlContent = “”;
- $(“#blogs > tbody > tr”).remove();
- $.each(result, function (key, item) {
- htmlContent = htmlContent + “<tr><td>” + item.Id + “</td><td>” + item.Name + “</td><td>” + item.Url + “</td></tr>”;
- });
- // Appending HTML content
- $(‘#blogs’).append(htmlContent);
- },
- error: function (err) {
- alert(err.statusText);
- }
- });
- }
- // Searching a record
- function find() {
- var id = $(‘#blogId’).val();
- $.getJSON(‘http://localhost:1312/api/Blog/’ + id + ‘?type=json’)
- .done(function (data) {
- var htmlContent = “<b>Blog</b>: ” + data.Name + “<br/>” + “<b>Url</b>:” + data.Url;
- $(‘#blog’).html(htmlContent);
- })
- .fail(function (jqXHR, textStatus, err) {
- $(‘#blog’).text(‘Error: ‘ + err);
- });
- }
- </script>
Preceding code contains 3 AJAX requests. Firstly, AJAX request call to Web API and load all records to table (Figure 5). Secondly, AJAX request is for adding a record using HTTP POST method. Third, AJAX request is for searching a record and display it (Figure 6).

Figure 5: Add New MVC project
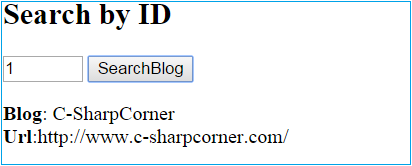
Figure 6: Add New MVC project
Send result in different formats like XML, JSON
After developing the WebAPI we need to host the service for client. There are different types of client with different type requirement. Means some client need result in XML format and same time some client need it JSON format. By default Web API returns result in XML format. So if our service need to support both the formats then we need to add code in WebApiConfig.cs file.
In order to accomplish above requirement, we will force the user to send us information what type format they need. And they will send the info by adding extra parameter type like the following url:
http://localhost:1312/api/Blog?type=xml
http://localhost:1312/api/Blog?type=json
If client need data in JSON format then type=json and same way if it is XML then type=xml,
Here is the complete code you need to add in WebApiConfig.cs file:
- public static void Register(HttpConfiguration config)
- {
- config.Routes.MapHttpRoute(
- name: “DefaultExt”,
- routeTemplate: “api/{controller}/{id}”,
- defaults: new { id = RouteParameter.Optional }
- );
- // To disable tracing in your application, please comment out or remove the following line of code
- // For more information, refer to: http://www.asp.net/web-api
- config.EnableSystemDiagnosticsTracing();
- // Adding formatter for Json
- config.Formatters.JsonFormatter.MediaTypeMappings.Add(
- new QueryStringMapping(“type”, “json”, new MediaTypeHeaderValue(“application/json”)));
- // Adding formatter for XML
- config.Formatters.XmlFormatter.MediaTypeMappings.Add(
- new QueryStringMapping(“type”, “xml”, new MediaTypeHeaderValue(“application/xml”)));
- }
Here client 1 needs data in XML then browse URL like http://localhost:1312/api/Blog?type=xml, See the following figure to see the output.

Figure 7: Result in XML format
Here client 2 needs data in XML then browse URL like http://localhost:1312/api/Blog?type=json, See the following figure to see the output.

Figure 8: Result in JSON format
29] Can you use API response depending upon client? How to implement this?
Explained Above
30] Explain Grid in bootstrap
Bootstrap’s grid system allows up to 12 columns across the page.
38] How to created responsive menu in bootstrap
Bootstrap’s grid system allows up to 12 columns across the page. Span across that.
31] What is Iframe?
You can define an inline frame with HTML tag <iframe>. The <iframe> tag is not somehow related to <frameset> tag, instead, it can appear anywhere in your document. The <iframe> tag defines a rectangular region within the document in which the browser can display a separate document, including scrollbars and borders. An inline frame is used to embed another document within the current HTML document.
The src attribute is used to specify the URL of the document that occupies the inline frame.
Example
Following is the example to show how to use the <iframe> −
<!DOCTYPE html>
<html>
<head>
<title>HTML Iframes</title>
</head>
<body>
<p>Document content goes here…</p>
<iframe src = “/html/menu.htm” width = “555” height = “200”>
Sorry your browser does not support inline frames.
</iframe>
<p>Document content also go here…</p>
</body>
</html>
This will produce the following result −
The <Iframe> Tag Attributes
Most of the attributes of the <iframe> tag, including name, class, frameborder, id, longdesc, marginheight, marginwidth, name, scrolling, style,and title behave exactly like the corresponding attributes for the <frame> tag.
Note − The frameborder, marginwidth, longdesc, scrolling, marginheight attributes deprecated in HTML5. Do not use these attributes.
| Sr.No | Attribute & Description |
| 1 | srcThis attribute is used to give the file name that should be loaded in the frame. Its value can be any URL. For example, src = “/html/top_frame.htm” will load an HTML file available in html directory. |
| 2 | nameThis attribute allows you to give a name to a frame. It is used to indicate which frame a document should be loaded into. This is especially important when you want to create links in one frame that load pages into an another frame, in which case the second frame needs a name to identify itself as the target of the link. |
| 3 | frameborderThis attribute specifies whether or not the borders of that frame are shown; it overrides the value given in the frameborder attribute on the <frameset> tag if one is given, and this can take values either 1 (yes) or 0 (no). |
| 4 | marginwidthThis attribute allows you to specify the width of the space between the left and right of the frame’s borders and the frame’s content. The value is given in pixels. For example marginwidth = “10”. |
| 5 | marginheightThis attribute allows you to specify the height of the space between the top and bottom of the frame’s borders and its contents. The value is given in pixels. For example marginheight = “10”. |
| 6 | heightThis attribute specifies the height of <iframe>. |
| 7 | scrollingThis attribute controls the appearance of the scrollbars that appear on the frame. This takes values either “yes”, “no” or “auto”. For example scrolling = “no” means it should not have scroll bars. |
| 8 | longdescThis attribute allows you to provide a link to another page containing a long description of the contents of the frame. For example longdesc = “framedescription.htm” |
| 9 | widthThis attribute specifies the width of <iframe>. |
32] Can you used Ajax call in your project?
AngularJS $http
The AngularJS $http service makes a request to the server, and returns a response.
Example
Make a simple request to the server, and display the result in a header:
<div ng-app=”myApp” ng-controller=”myCtrl”>
<p>Today’s welcome message is:</p>
<h1>{{myWelcome}}</h1>
</div>
<script>
var app = angular.module(‘myApp’, []);
app.controller(‘myCtrl’, function($scope, $http) {
$http.get(“welcome.htm”)
.then(function(response) {
$scope.myWelcome = response.data;
});
});
</script>
Methods
The example above uses the .get method of the $http service.
The .get method is a shortcut method of the $http service. There are several shortcut methods:
- .delete()
- .get()
- .head()
- .jsonp()
- .patch()
- .post()
- .put()
The methods above are all shortcuts of calling the $http service:
Example
var app = angular.module(‘myApp’, []);
app.controller(‘myCtrl’, function($scope, $http) {
$http({
method : “GET”,
url : “welcome.htm”
}).then(function mySuccess(response) {
$scope.myWelcome = response.data;
}, function myError(response) {
$scope.myWelcome = response.statusText;
});
});
The example above executes the $http service with an object as an argument. The object is specifying the HTTP method, the url, what to do on success, and what to do on failure.
Properties
The response from the server is an object with these properties:
- .config the object used to generate the request.
- .data a string, or an object, carrying the response from the server.
- .headers a function to use to get header information.
- .status a number defining the HTTP status.
- .statusText a string defining the HTTP status.
Example
var app = angular.module(‘myApp’, []);
app.controller(‘myCtrl’, function($scope, $http) {
$http.get(“welcome.htm”)
.then(function(response) {
$scope.content = response.data;
$scope.statuscode = response.status;
$scope.statustext = response.statusText;
});
});
To handle errors, add one more functions to the .then method:
Example
var app = angular.module(‘myApp’, []);
app.controller(‘myCtrl’, function($scope, $http) {
$http.get(“wrongfilename.htm”)
.then(function(response) {
//First function handles success
$scope.content = response.data;
}, function(response) {
//Second function handles error
$scope.content = “Something went wrong”;
});
});
JSON
The data you get from the response is expected to be in JSON format.
JSON is a great way of transporting data, and it is easy to use within AngularJS, or any other JavaScript.
Example: On the server we have a file that returns a JSON object containing 15 customers, all wrapped in array called records.
Click here to take a look at the JSON object.
Example
The ng-repeat directive is perfect for looping through an array:
<div ng-app=”myApp” ng-controller=”customersCtrl”>
<ul>
<li ng-repeat=”x in myData”>
{{ x.Name + ‘, ‘ + x.Country }}
</li>
</ul>
</div>
<script>
var app = angular.module(‘myApp’, []);
app.controller(‘customersCtrl’, function($scope, $http) {
$http.get(“customers.php”).then(function(response) {
$scope.myData = response.data.records;
});
});
</script>
Application explained:
The application defines the customersCtrl controller, with a $scope and $http object.
$http is an XMLHttpRequest object for requesting external data.
$http.get() reads JSON data from https://www.w3schools.com/angular/customers.php.
On success, the controller creates a property, myData, in the scope, with JSON data from the server.
34] If the call is failed in AJAX how to handle in this.
Log4Net- File,DB /DB Call /Console Check in firebug