Let vs Var
let allows you to declare variables that are limited in scope to the block, statement,or expression on which it is used. This is unlike the var keyword, which defines a variable globally, or locally to an entire function regardless of block scope.
Child Component & Parent Component Interaction:
Parent to Child: Sharing Data via Input
This is probably the most common and straightforward method of sharing data. It works by using the @Input() decorator to allow data to be passed via the template.
parent.component.ts
| import { Component } from ‘@angular/core’; @Component({ selector: ‘app-parent’, template: ` <app-child [childMessage]=”parentMessage”></app-child> `, styleUrls: [‘./parent.component.css’] }) export class ParentComponent{ parentMessage = “message from parent” constructor() { } } |
child.component.ts
| import { Component, Input } from ‘@angular/core’; @Component({ selector: ‘app-child’, template: ` Say {{ message }} `, styleUrls: [‘./child.component.css’] }) export class ChildComponent { @Input() childMessage: string; constructor() { } } |
Child to Parent: Sharing Data via ViewChild
ViewChild allows a one component to be injected into another, giving the parent access to its attributes and functions. One caveat, however, is that child won’t be available until after the view has been initialized. This means we need to implement the AfterViewInit lifecycle hook to receive the data from the child.
parent.component.ts
| import { Component, ViewChild, AfterViewInit } from ‘@angular/core’; import { ChildComponent } from “../child/child.component”; @Component({ selector: ‘app-parent’, template: ` Message: {{ message }} <app-child></app-child> `, styleUrls: [‘./parent.component.css’] }) export class ParentComponent implements AfterViewInit { @ViewChild(ChildComponent) child; constructor() { } message:string; ngAfterViewInit() { this.message = this.child.message } } |
child.component.ts
| import { Component} from ‘@angular/core’; @Component({ selector: ‘app-child’, template: ` `, styleUrls: [‘./child.component.css’] }) export class ChildComponent { message = ‘Hola Mundo!’; constructor() { } } |
Child to Parent: Sharing Data via Output() and EventEmitter
Another way to share data is to emit data from the child, which can be listed to by the parent. This approach is ideal when you want to share data changes that occur on things like button clicks, form entires, and other user events.
In the parent, we create a function to receive the message and set it equal to the message variable.
In the child, we declare a messageEvent variable with the Output decorator and set it equal to a new event emitter. Then we create a function named sendMessage that calls emit on this event with the message we want to send. Lastly, we create a button to trigger this function.
The parent can now subscribe to this messageEvent that’s outputted by the child component, then run the receive message function whenever this event occurs.
parent.component.ts
| import { Component } from ‘@angular/core’; @Component({ selector: ‘app-parent’, template: ` Message: {{message}} <app-child (messageEvent)=”receiveMessage($event)”></app-child> `, styleUrls: [‘./parent.component.css’] }) export class ParentComponent { constructor() { } message:string; receiveMessage($event) { this.message = $event } } |
child.component.ts
| import { Component, Output, EventEmitter } from ‘@angular/core’; @Component({ selector: ‘app-child’, template: ` <button (click)=”sendMessage()”>Send Message</button> `, styleUrls: [‘./child.component.css’] }) export class ChildComponent { message: string = “Hola Mundo!” @Output() messageEvent = new EventEmitter<string>(); constructor() { } sendMessage() { this.messageEvent.emit(this.message) } } |
Unrelated Components: Sharing Data with a Service
When passing data between components that lack a direct connection, such as siblings, grandchildren, etc, you should you a shared service. When you have data that should aways been in sync, I find the RxJS BehaviorSubject very useful in this situation.
You can also use a regular RxJS Subject for sharing data via the service, but here’s why I prefer a BehaviorSubject.
- It will always return the current value on subscription – there is no need to call onnext
- It has a getValue() function to extract the last value as raw data.
- It ensures that the component always receives the most recent data.
In the service, we create a private BehaviorSubject that will hold the current value of the message. We define a currentMessage variable handle this data stream as an observable that will be used by the components. Lastly, we create function that calls next on the BehaviorSubject to change its value.
The parent, child, and sibling components all receive the same treatment. We inject the DataService in the constructor, then subscribe to the currentMessage observable and set its value equal to the message variable.
Now if we create a function in any one of these components that changes the value of the message. when this function is executed the new data it’s automatically broadcast to all other components.
data.service.ts
| import { Injectable } from ‘@angular/core’; import { BehaviorSubject } from ‘rxjs’; @Injectable() export class DataService { private messageSource = new BehaviorSubject(‘default message’); currentMessage = this.messageSource.asObservable(); constructor() { } changeMessage(message: string) { this.messageSource.next(message) } } |
parent.component.ts
| import { Component, OnInit } from ‘@angular/core’; import { DataService } from “../data.service”; @Component({ selector: ‘app-parent’, template: ` {{message}} `, styleUrls: [‘./sibling.component.css’] }) export class ParentComponent implements OnInit { message:string; constructor(private data: DataService) { } ngOnInit() { this.data.currentMessage.subscribe(message => this.message = message) } } |
sibling.component.ts
| import { Component, OnInit } from ‘@angular/core’; import { DataService } from “../data.service”; @Component({ selector: ‘app-sibling’, template: ` {{message}} <button (click)=”newMessage()”>New Message</button> `, styleUrls: [‘./sibling.component.css’] }) export class SiblingComponent implements OnInit { message:string; constructor(private data: DataService) { } ngOnInit() { this.data.currentMessage.subscribe(message => this.message = message) } newMessage() { this.data.changeMessage(“Hello from Sibling”) } } |
Angular Routing
import { RouterModule, Routes } from ‘@angular/router’;
A routed Angular application has one singleton instance of the Router service. When the browser’s URL changes, that router looks for a corresponding Route from which it can determine the component to display.
A router has no routes until you configure it. The following example creates five route definitions, configures the router via the RouterModule.forRoot method, and adds the result to the AppModule’s imports array.
const appRoutes: Routes = [
{ path: ‘crisis-center’, component: CrisisListComponent },
{ path: ‘hero/:id’, component: HeroDetailComponent },
{
path: ‘heroes’,
component: HeroListComponent,
data: { title: ‘Heroes List’ }
},
{ path: ”,
redirectTo: ‘/heroes’,
pathMatch: ‘full’
},
{ path: ‘**’, component: PageNotFoundComponent }
];
@NgModule({
imports: [
RouterModule.forRoot(
appRoutes,
{ enableTracing: true } // <– debugging purposes only
)
// other imports here
],
…
})
export class AppModule { }
The appRoutes array of routes describes how to navigate. Pass it to the RouterModule.forRoot method in the module imports to configure the router.
Each Route maps a URL path to a component. There are no leading slashes in the path. The router parses and builds the final URL for you, allowing you to use both relative and absolute paths when navigating between application views.
The RouterOutlet is a directive from the router library that is used like a component. It acts as a placeholder that marks the spot in the template where the router should display the components for that outlet.
<router-outlet></router-outlet>
The RouterLink directives on the anchor tags give the router control over those elements. The navigation paths are fixed, so you can assign a string to the routerLink (a “one-time” binding).
During each navigation, the Router emits navigation events through the Router.events property. These events range from when the navigation starts and ends to many points in between.

Observables and RxJS
What is RxJS?
RxJS or Reactive Extensions for JavaScript is a library for transforming, composing, and querying streams of data. We mean all kinds of data too, from simple arrays of values, to series of events (unfortunate or otherwise), to complex flows of data.
Observables:
A proposed standard for managing async data that will be included in the release of ES7. Observables open up a continuous channel of communication in which multiple values of data can be emitted over time. From this we get a pattern of dealing with data by using array-like operations to parse, modify and maintain data. Angular uses observables extensively – you’ll see them in the HTTP service and the event system.
Observables, Observers & Subscriptions
- An observable is a function that produces a stream of values to an observer over time.
- When you subscribe to an observable, you are an observer.
- An observable can have multiple observers.
Observables provide support for passing messages between publishers and subscribers in your application. Observables offer significant benefits over other techniques for event handling, asynchronous programming, and handling multiple values.
Observables are declarative—that is, you define a function for publishing values, but it is not executed until a consumer subscribes to it. The subscribed consumer then receives notifications until the function completes, or until they unsubscribe.
An observable can deliver multiple values of any type—literals, messages, or events, depending on the context. The API for receiving values is the same whether the values are delivered synchronously or asynchronously. Because setup and teardown logic are both handled by the observable, your application code only needs to worry about subscribing to consume values, and when done, unsubscribing. Whether the stream was keystrokes, an HTTP response, or an interval timer, the interface for listening to values and stopping listening is the same.

Subscribe

An observer is simply a set of callbacks that accept notifications coming from the observer, which include:
- next
- error
- complete
Publisher Subscriber Model

EventEmitter
Event Emitter emits the event and it is captured by some looking for that event which acts as per the parameter passed by the event emitter
State Management in Angular
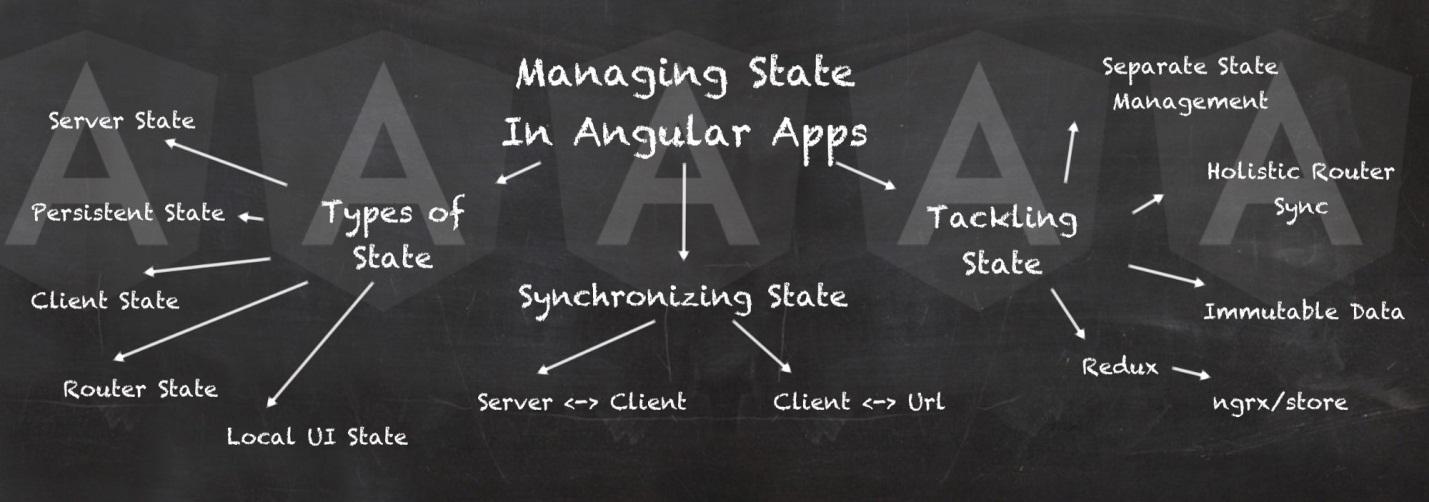
Types of State
A typical web application has the following six types of state:
- Server state
- Persistent state
- The URL and router state
- Client state
- Transient client state
- Local UI state
The server state is stored, unsurprisingly, on the server and is provided via, for example, a REST endpoint. The persistent state is a subset of the server state stored on the client, in memory. Naively, we can treat the persistent state as a cache of the server state. In real applications though this doesn’t work as we often want to apply optimistic updates to provide a better user experience.
The client state is not stored on the server. A good example is the filters used to create a list of items displayed to the user. The items themselves are stored in some database on the server, but the values of the filters are not.
Recommendation: It’s a good practice to reflect both the persistent and client state in the URL.
Applications often have state that is stored on the client, but is not represented in the URL. For instance, YouTube remembers where I stopped the video. So next time I start watching it, it will resume the video from that moment. Since this information is not stored in the URL, if I pass a link to someone else, they will start watching from the beginning. This is transient client state.
Finally, individual components can have local state governing small aspects of their behavior. Should a zippy be expanded? What should be the color of a button? This is local UI state.
BootStrapping
Bootstrapping is an essential process in Angular – it is where the application is loaded when Angular comes to life.
Undefined vs Null
undefined means a variable has been declared but has not yet been assigned a value. On the other hand, null is an assignment value. It can be assigned to a variable as a representation of no value. Also, undefined and null are two distinct types: undefined is a type itself (undefined) while null is an object
One way binding VS 2 way binding

ngFor vs ngIf
ngFor is used to loop an HTML code as per values
ngIf is used to show hide or Boolean conditional handling of HTML Code
Dynamic Component
Components loaded on runtime @ViewChild is used and ng-template is used to render the same
Directives overview
There are three kinds of directives in Angular:
- Components—directives with a template.
- Structural directives—change the DOM layout by adding and removing DOM elements.
- Attribute directives—change the appearance or behavior of an element, component, or another directive.
Components are the most common of the three directives. You saw a component for the first time in the Getting Started.
Structural Directives change the structure of the view. Two examples are NgFor and NgIf. Learn about them in the Structural Directives guide.
Attribute directives are used as attributes of elements. The built-in NgStyle directive in the Template Syntax guide, for example, can change several element styles at the same time.
Lifecycle Hooks
A component has a lifecycle managed by Angular.
Angular creates it, renders it, creates and renders its children, checks it when its data-bound properties change, and destroys it before removing it from the DOM.
Angular offers lifecycle hooks that provide visibility into these key life moments and the ability to act when they occur.
Pipes
Angular 2 provides some great pipes that carry over well from the filters we are used to in Angular 1.x. We also get some new pipes that give us special functionality, such as the async pipe, which binds our templates to asynchronous resources
The async pipe is a special kind of impure pipe that either waits for a promise to resolve to display data or subscribes to an observable to display the emitted values
HttpClient
Most front-end applications communicate with backend services over the HTTP protocol. Modern browsers support two different APIs for making HTTP requests: the XMLHttpRequest interface and the fetch() API.
The HttpClient in @angular/common/http offers a simplified client HTTP API for Angular applications that rests on the XMLHttpRequest interface exposed by browsers.
Component Styles
Component Specific Styles
The == operator will compare for equality after doing any necessary type conversions. The ===operator will not do the conversion, so if two values are not the same type === will simply return false.
***