#: JSON
JSON: JavaScript Object Notation.
JSON is syntax for storing and exchanging data.
JSON is text, written with JavaScript object notation.
Exchanging Data
When exchanging data between a browser and a server, the data can only be text.
JSON is text, and we can convert any JavaScript object into JSON, and send JSON to the server.
We can also convert any JSON received from the server into JavaScript objects.
This way we can work with the data as JavaScript objects, with no complicated parsing and translations.
Sending Data
If you have data stored in a JavaScript object, you can convert the object into JSON, and send it to a server:
Example
var myObj = {name: “John”, age: 31, city: “New York”};
var myJSON = JSON.stringify(myObj);
window.location = “demo_json.php?x=” + myJSON;
Receiving Data
If you receive data in JSON format, you can convert it into a JavaScript object:
Example
var myJSON = ‘{“name”:”John”, “age”:31, “city”:”New York”}’;
var myObj = JSON.parse(myJSON);
document.getElementById(“demo”).innerHTML = myObj.name;
#: JS Object format
Example
{ “name”:”John”, “age”:30, “car”:null }
JSON objects are surrounded by curly braces {}.
JSON objects are written in key/value pairs.
Keys must be strings, and values must be a valid JSON data type (string, number, object, array, boolean or null).
Keys and values are separated by a colon.
Each key/value pair is separated by a comma.
#: JSON vs XML
XML provides the capability to display data because it is a markup language. JSON files are more human readable than XML. JSON supports only text and number data type. XML support many data types such as text, number, images, charts, graphs etc.
Why JSON format is better than XML?
The more lightweight JSON (JavaScript object notation) has become a popular alternative to XML for various reasons. A couple obvious ones are: Less verbose-XML uses more words than necessary. JSON is faster– Parsing XML software is slow and cumbersome
#: Angular 2 lifecycle hooks
Lifecycle Hooks
A component has a lifecycle managed by Angular.
Angular creates it, renders it, creates and renders its children, checks it when its data-bound properties change, and destroys it before removing it from the DOM.
Angular offers lifecycle hooks that provide visibility into these key life moments and the ability to act when they occur.
A directive has the same set of lifecycle hooks.
Note: No directive or component will implement all of the lifecycle hooks. Angular only calls a directive/component hook method if it is defined.
Lifecycle sequence
After creating a component/directive by calling its constructor, Angular calls the lifecycle hook methods in the following sequence at specific moments:
| Hook | Purpose and Timing |
| ngOnChanges() | Respond when Angular (re)sets data-bound input properties. The method receives a SimpleChanges object of current and previous property values.Called before ngOnInit() and whenever one or more data-bound input properties change. |
| ngOnInit() | Initialize the directive/component after Angular first displays the data-bound properties and sets the directive/component’s input properties.Called once, after the first ngOnChanges(). |
| ngDoCheck() | Detect and act upon changes that Angular can’t or won’t detect on its own.Called during every change detection run, immediately after ngOnChanges()and ngOnInit(). |
| ngAfterContentInit() | Respond after Angular projects external content into the component’s view / the view that a directive is in.Called once after the first ngDoCheck(). |
| ngAfterContentChecked() | Respond after Angular checks the content projected into the directive/component.Called after the ngAfterContentInit() and every subsequent ngDoCheck(). |
| ngAfterViewInit() | Respond after Angular initializes the component’s views and child views / the view that a directive is in.Called once after the first ngAfterContentChecked(). |
| ngAfterViewChecked() | Respond after Angular checks the component’s views and child views / the view that a directive is in.Called after the ngAfterViewInit and every subsequent ngAfterContentChecked(). |
| ngOnDestroy() | Cleanup just before Angular destroys the directive/component. Unsubscribe Observables and detach event handlers to avoid memory leaks.Called just before Angular destroys the directive/component. |
#: Custom Pipes
Angular pipes is a way to write display-value transformations that you can declare in your HTML.

#: Angular 2 nesting components
One of the most popular aspects of web frameworks like Angular 2 is the idea of “componentizing” all the various parts of your application. Angular 2 has proven, more than ever, how separating your application into separate components can help improve code management and reuse. Let’s take a look at a very simple example of nesting components and how we can construct this.
For our example, we will be constructing two components that resemble a basic application layout — a main App component and a Header component that is nested within it. We will not go too far into the details since our focus here is more about how nesting components works rather than how to create a fully fledged layout.
app/app.component.ts
import { Component } from ‘@angular/core’;
@Component({
selector: ‘my-app’,
templateUrl: ‘src/app/app.component.html’
})
export class AppComponent {
constructor() {}
}
And its template is the following:
app/app.component.html
<layout-header></layout-header>
Nested components rule!
You’ll notice that we placed an HTML tag called <layout-header> — this is how you nest components in Angular 2! This tag name should be identical to the selector metadata in the header component itself, otherwise it won’t actually place our header component there. Lets take a look:
app/shared/layout/header.component.ts
import { Component } from ‘@angular/core’;
@Component({
selector: ‘layout-header’,
templateUrl: ‘src/app/shared/layout/header.component.html’
})
export class HeaderComponent {
constructor() {}
name: string = ‘Angular2’;
}
And it’s template:
app/shared/layout/header.component.html
<div>
<h2>Hello {{name}}</h2>
</div>
As displayed above, you can see that it does not take a whole lot of code to nest components. <layout-header> is our child component and displays an H2, and the AppComponent is the parent component that hosts it.
Now, you may remember that we can’t use components until they are declared in a module — this is still true. Lets modify the AppModule to declare the HeaderComponent:
app/app.module.ts
import { NgModule } from ‘@angular/core’
import { BrowserModule } from ‘@angular/platform-browser’
import { AppComponent } from ‘./app.component’;
import { HeaderComponent } from ‘./shared/index’;
@NgModule({
imports: [
BrowserModule
],
declarations: [
AppComponent,
HeaderComponent
],
bootstrap: [
AppComponent
]
})
export class AppModule {}
Reference: https://thinkster.io/tutorials/angular-2-components/nesting-components
#: input, Output and event emitter
Reference: https://dzone.com/articles/understanding-output-and-eventemitter-in-angular
Angular is based on a one-directional data flow and does not have two-way data binding. So, how do you get a component to emit an event to another component?
In Angular, a component can emit an event using @Output and EventEmitter. Both are parts of the @angular/core.
Confused by the jargon? Let’s simplify it together. Consider the AppChildComponent as shown below:
appchild.component.ts
import { Component, Input, EventEmitter, Output } from ‘@angular/core’;
@Component({
selector: ‘app-child’,
template: `<button class=’btn btn-primary’ (click)=”handleclick()”>Click me</button> `
})
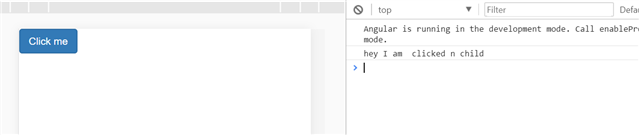
export class AppChildComponent {
handleclick() {
console.log(‘hey I am clicked in child’);
}
}
There’s a button in the AppChildComponent template which is calling the function handleclick. Let’s use the app-child component inside the App Compontent as shown below:
appcomponent.ts
import { Component, OnInit } from ‘@angular/core’;
@Component({
selector: ‘app-root’,
template: `<app-child></app-child>`
})
export class AppComponent implements OnInit {
ngOnInit() {
}
}
Here we’re using AppChildCopmponent inside AppComponent, thereby creating a parent/child kind of relationship, in which AppComponent is the parent and AppChildComponent is the child. When we run the application with a button click, you’ll see this message in the browser console:
So far, it’s very simple to use event binding to get the button to call the function in the component. Now, let’s tweak the requirement a bit. What if you want to execute a function of AppComponent on the click event of a button inside AppChildComponent?
To do this, you will have to emit the button click event from AppChildComponent. Import EventEmitterand Output from @angular/core.
Here we are going to emit an event and pass a parameter to the event. Consider the code below:
appchild.component.ts
import { Component, EventEmitter, Output } from ‘@angular/core’;
@Component({
selector: ‘app-child’,
template: `<button class=’btn btn-primary’ (click)=”valueChanged()”>Click me</button> `
})
export class AppChildComponent {
@Output() valueChange = new EventEmitter();
Counter = 0;
valueChanged() { // You can give any function name
this.counter = this.counter + 1;
this.valueChange.emit(this.counter);
}
}
Right now, we are performing the following tasks in the AppChildComponent class:
- Creating a variable called counter, which will be passed as the parameter of the emitted event.
- Creating an EventEmitter, valueChange, which will be emitted to the parent component on the click event of the button.
- Creating a function named valueChanged(). This function is called on the click event of the button, and inside the function event valueChange is emitted.
- While emitting the valueChange event, the value of the counter is passed as a parameter.
In the parent component, AppComponent, the child component, AppChildComponent, can be used as shown in the code below:
appcomponent.ts
import { Component, OnInit } from ‘@angular/core’;
@Component({
selector: ‘app-root’,
template: `<app-child (valueChange)=’displayCounter($event)’></app-child>`
})
export class AppComponent implements OnInit {
ngOnInit() {
}
displayCounter(count) {
console.log(count);
}
}
Right now, we are performing the following tasks in the AppComponent class:
- Using <app-child> in the template.
- In the <app-child> element, using event binding to use the valueChange event.
- Calling the displayCounter function on the valueChange event.
- In the displayCounter function, printing the value of the counter passed from the AppChildComponent.
As you can see, the function AppComponent is called on the click event of the button placed on the AppChildComponent. This is can be done with @Output and EventEmitter. When you run the application and click the button, you can see the value of the counter in the browser console. Each time you click on the button, the counter value is increased by 1.
A Real-Time Example
Let’s take a real-time example to find out how @Output and EventEmitter can be more useful. Consider that AppComponent is rendering a list of products in a tabular form as shown in the image below:

To create the product table above, we have a very simple AppComponent class with only one function: to return a list of products.
export class AppComponent implements OnInit {
products = [];
title = ‘Products’;
ngOnInit() {
this.products = this.getProducts();
}
getProducts() {
return [
{ ‘id’: ‘1’, ‘title’: ‘Screw Driver’, ‘price’: 400, ‘stock’: 11 },
{ ‘id’: ‘2’, ‘title’: ‘Nut Volt’, ‘price’: 200, ‘stock’: 5 },
{ ‘id’: ‘3’, ‘title’: ‘Resistor’, ‘price’: 78, ‘stock’: 45 },
{ ‘id’: ‘4’, ‘title’: ‘Tractor’, ‘price’: 20000, ‘stock’: 1 },
{ ‘id’: ‘5’, ‘title’: ‘Roller’, ‘price’: 62, ‘stock’: 15 },
];
}
}
In the ngOnInit lifecycle hook, we are calling the getPrdoducts() function and assigning the returned data to the products variable so it can be used in the template. There, we are using the *ngFor directive to iterate through the array and display the products. See the code below:
<div class=”container”>
<br />
<h1 class=”text-center”>{{title}}</h1>
<table class=”table”>
<thead>
<th>Id</th>
<th>Title</th>
<th>Price</th>
<th>Stock</th>
</thead>
<tbody>
<tr *ngFor=”let p of products”>
<td>{{p.id}}</td>
<td>{{p.title}}</td>
<td>{{p.price}}</td>
<td>{{p.stock}}</td>
</tr>
</tbody>
</table>
</div>
With this code, products are rendered in a table as shown in the image below:

Now let’s say we want to add a new column with a button and input box as shown in the image below:
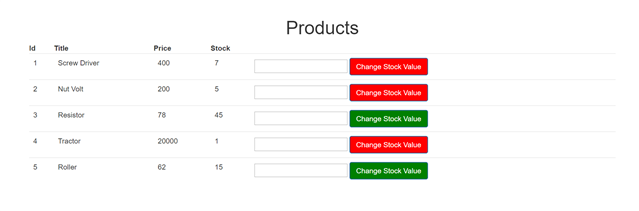
Our requirements are as follows:
- If the value of stock is more than 10 then the button color should be green.
- If the value of stock is less than 10 then the button color should be red.
- The user can enter a number in the input box, which will be added to that particular stock value.
- The color of the button should be updated on the basis of the changed value of the product stock.
To achieve this, let us create a new child component called StockStatusComponent. Essentially, in the template of StockStatusCompontent, there is one button and one numeric input box. In StockStatusCompontent:
- We need to read the value of stock passed from AppComponnet. For this, we need to use @Input
- We need to emit an event so that a function in AppComponent can be called on the click of the StockStatusComponent For this, we need to use @Output and EventEmitter.
Consider the code below:
stockstatus.component.ts
import { Component, Input, EventEmitter, Output, OnChanges } from ‘@angular/core’;
@Component({
selector: ‘app-stock-status’,
template: `<input type=’number’ [(ngModel)]=’updatedstockvalue’/> <button class=’btn btn-primary’
[style.background]=’color’
(click)=”stockValueChanged()”>Change Stock Value</button> `
})
export class StockStatusComponent implements OnChanges {
@Input() stock: number;
@Input() productId: number;
@Output() stockValueChange = new EventEmitter();
color = ”;
updatedstockvalue: number;
stockValueChanged() {
this.stockValueChange.emit({ id: this.productId, updatdstockvalue: this.updatedstockvalue });
this.updatedstockvalue = null;
}
ngOnChanges() {
if (this.stock > 10) {
this.color = ‘green’;
} else {
this.color = ‘red’;
}
}
}
Let’s explore the above class line by line.
- In the first line, we are importing everything that’s required: @Input, @Output, etc.
- In the template, there is one numeric input box which is bound to the updatedStockValue property using [(ngModel)]. We need to pass this value with an event to the AppComponent.
- In the template, there is one button. On the click event of the button, an event is emitted to the AppComponent.
- We need to set the color of the button on the basis of the value of product stock. So, we must use property binding to set the background of the button. The value of the color property is updated in the class.
- We are creating two @Input() decorated properties – stock and productId – because the value of these two properties will be passed from AppComponent.
- We are creating an event called stockValueChange. This event will be emitted to AppComponenton the click of the button.
- In the stockValueChanged function, we are emitting the stockValueChange event and also passing the product id to be updated and the value to be added to the product stock value.
- We are updating the value of the color property in the ngOnChanges() lifecycle hook because each time the stock value gets updated in the AppComponent, the value of the color property should be updated.
Here we are using the @Input decorator to read data from AppComponent class, which happens to be the parent class in this case. So to pass data from the parent component class to the child component class, use the @Input decorator.
In addition, we are using @Output with EventEmitter to emit an event to AppComponent. So to emit an event from the child component class to the parent component class, use EventEmitter with the @Output() decorator.
Therefore, StockStatusComponent is using both @Input and @Output to read data from AppComponent and emit an event to AppComponent.
Modify AppComponent to Use StockStatusComponent
Let us first modify the template. In the template, add a new table column. Inside the column, the <app-stock-status> component is used.
<div class=”container”>
<br />
<h1 class=”text-center”>{{title}}</h1>
<table class=”table”>
<thead>
<th>Id</th>
<th>Title</th>
<th>Price</th>
<th>Stock</th>
</thead>
<tbody>
<tr *ngFor=”let p of products”>
<td>{{p.id}}</td>
<td>{{p.title}}</td>
<td>{{p.price}}</td>
<td>{{p.stock}}</td>
<td><app-stock-status [productId]=’p.id’ [stock]=’p.stock’ (stockValueChange)=’changeStockValue($event)’></app-stock-status></td>
</tr>
</tbody>
</table>
</div>
We are passing the value to productId and stock using property binding (remember, these two properties are decorated with @Input() in StockStatusComponent) and using event binding to handle the stockValueChange event (remember, this event is decorated with @Output() in StockStatusComponent).
productToUpdate: any;
changeStockValue(p) {
this.productToUpdate = this.products.find(this.findProducts, [p.id]);
this.productToUpdate.stock = this.productToUpdate.stock + p.updatdstockvalue;
}
findProducts(p) {
return p.id === this[0];
}
In the function, we are using the JavaScript Array.prototype.find method to find a product with a matched productId and then updating the stock count of the matched product. When you run the application, you’ll get the following output:

When you enter a number in the numeric box and click on the button, you perform a task in the child component that updates the operation value in the parent component. Also, on the basis of the parent component value, the style is being changed in the child component. All this is possible using Angular @Input, @Output, and EventEmitter.
In summary:

#: DESIGN PATTERNS
Reference: https://www.c-sharpcorner.com/article/design-patterns-in-c-sharp/
Design patterns have picked up a lot of importance off late and rightfully so. To define design patterns in simple words they are “popular solutions for common design problems”. They are very helpful in designing architecture and they also increase ease of communication among the developers. I have practically applied few design patterns myself and would like to share my knowledge with you.
To start off GOF(Gang of Four) design patterns which are considered as the foundation of design patterns have been categorized into three sections namely creational which involves creation of objects, structural and behavioral patterns. I will cover all three sections by explaining one or more patterns from each individual section.
Creational Section:
Singleton Pattern:
This is a very popular creational pattern which restricts a class to have only one instance.
Example: “Prime Minister of India” is a singleton pattern as he/she has unique responsibilities and attributes.
Implementation: A singleton class can’t have a public constructor and it has to be sealed. The entry point to get the singleton instance would be a static method or a static property.
public sealed class PrimeMinister
{
private static PrimeMinister instance = new PrimeMinister();
private PrimeMinister(){ }
public static PrimeMinister Instance
{
get { return instance; }
}
}
Abstract Factory Pattern:
Abstract Factory is commonly known as factory pattern. In this pattern all the classes involved implement/realize the same interface and the compiler only knows that the created object implements the specific interface but not the object’s type. This is very flexible when you need to make a creation decision at runtime depending on some aspect of object’s behavior rather than it’s type.
Example: Imagine that there is a rental store of cars, bikes, trucks, etc but you want to deliver a vehicle depending on the customer’s choice.
Implementation: Programmatically you can make a run time decision using a switch statement to return a new instance of a class which implements the specific interface depending on the customer’s choice. As you can see in the constructor of “Journey” class we are getting vehicletype of the current customer and passing it to the VehicleSupplier class’s static method “GetVehicle”. VehicleSupplier relies on a switch statement to return the vehicle needed, so if you observe here compiler just knows that newly created object implements the “IVehicle” interface but not if it’s a car, truck or a bike upfront.
public class Journey
{
public IVehicle rentedVehicle;
public Journey(string customerID)
{
VehicleType vType = Customer.GetVehicleType(customerID);
/*Here is the late binding. Compiler doesn’t know the type of the object except that it implements the IVehicle interface*/
rentedVehicle = VehicleSupplier.GetVehicle(vType);
}
//Method for beginning the journey
public void BeginJourney()
{
if(rentedVehicle != null)
{
rentedVehicle.Drive();
}
}
//Method for parking the vehicle
public void ParkTheVehicle()
{
if(rentedVehicle != null)
{
rentedVehicle.Park();
}
}
}
//The class which returns the new vehicle instance depending on the //vehicle type
public class VehicleSupplier
{
public static IVehicle GetVehicle(VehicleType vType)
{
switch(vType)
{
case VehicleType.CAR:
return new Car();
case VehicleType.TRUCK:
return new Truck();
case VehicleType.BIKE:
return new Bike();
}
return null;
}
}
//The interface which will be implemented by Car, Truck and Bike //classes
public interface IVehicle
{
void Drive();
void Park();
}
//enum of the vehicle types
public enum VehicleType{CAR=1,TRUCK,BIKE};
Structural Section:
Structural patterns depend on the structure of the classes involved. There are many structural patterns like Adapter, Builder, Decorator, etc. I will explain adapter pattern with an example here.
Adapter Pattern:
By converting the interface of one class into another interface which is expected by the clients we can make incompatible classes work together and this is the adapter pattern.
Example: Consider that you bought a gadget which expects 110v power supply but you are getting 240v supply, you need to get a power adapter in this case for converting 110v to 240v. This is a perfect example for the adapter pattern. In the software context you may need to have adapters for converting data from legacy systems like AS400 to XML or some other format for export purposes.
Implementation: As you can see the “StepUpStepDownPowerAdapter” object is used for converting power supply of 240V to 110V in the “TestUSGadget” class. The “USGadget” class defines the required voltage of the gadget and other properties. The converted power supply is given to the instance of “USGadget”.
/// Class for testing the gadget
public class TestUSGadget
{
public static void Test()
{
USGadget gadget = new USGadget();
//Indian or European power supply
PowerSupply supply = new PowerSupply(VoltageTypes.V240);
if(gadget.ExpectedVoltage != supply.Voltage)
{
StepUpStepDownPowerAdapter adapter = new StepUpStepDownPowerAdapter();
//Getting the converted power
supply = adapter.Convert(supply,gadget.ExpectedVoltage);
gadget.Power = supply;
gadget.Start();
}
}
}
public class StepUpStepDownPowerAdapter
{
public StepUpStepDownPowerAdapter()
{
}
//Method for coverting voltages
public PowerSupply Convert(PowerSupply supply,VoltageTypes convertToVoltage)
{
if(supply == null) return supply;
//Convert iff the voltage is not in expected way
if(supply.Voltage != convertToVoltage)
supply.Voltage = convertToVoltage;
return supply;
}
}
/// The power supply class
public class PowerSupply
{
VoltageTypes voltageType;
//There will be other properties as well
public PowerSupply(VoltageTypes vType)
{
voltageType = vType;
}
public VoltageTypes Voltage
{
get
{
return voltageType;
}
set
{
voltageType = value;
}
}
}
//Voltage Types enum
public enum VoltageTypes{V110,V240};
//Gadget which expects 110V
public class USGadget
{
VoltageTypes reqVoltage;
PowerSupply supply;
public USGadget()
{
reqVoltage = VoltageTypes.V110;
}
public VoltageTypes ExpectedVoltage
{
get
{
return reqVoltage;
}
}
public PowerSupply Power
{
get
{
return supply;
}
set
{
supply = value;
}
}
public void Start()
{
}
}
Behavioral Section:
Behavioral Patterns define the behavior of the classes involved. The popular behavioral patterns include Chain of Responsibilities,Interpreter, Mediator, Iterator, Observer, etc. I will explain Observer pattern here.
Observer pattern involves a one-many dependency between objects where a change in an object(subject) needs to be notified to all it’s dependents(observers).
Example: Consider a scenario where a job posting at some company got multiple applications. Whenever the job status changes (filled, removed or suspended) all the applicants of the job should be notified. In this case job object is subject and all the applicants are observers.
Implementation: As you can see below “Job” is the subject class and all applicants of that particular job are observers. Job class has “Add” and “Remove” methods for adding and removing applicants to it’s list. Whenever job status changes all the applicant objects would be notified through Notify method which in turn calls the “Update” method of the applicant object.
/// This the subject in the observer pattern.
public class Job
{
private ArrayList applicants;
private JobStatus statusOfJob;
public Job()
{
applicants = new ArrayList();
}
public void Add(Applicant candidate)
{
applicants.Add(candidate);
}
public void Remove(Applicant candidate)
{
applicants.Remove(candidate);
}
public void Notify()
{
foreach (Applicant candidate in applicants)
{
candidate.Update(this);
}
}
public JobStatus Status
{
get
{
return statusOfJob;
}
set
{
statusOfJob = value;
Notify();
}
}
}
//Jobstatus enumerator
public enum JobStatus{FILLED,SUSPENDED,REMOVED};
/// This is Observer.
public class Applicant
{
//declare variables
string fname;
string lname;
string emailID;
string phoneNo;
public Applicant()
{
//
// TODO: Add constructor logic here
//
}
#region Properties for exposing the member variables
#endregion
public void Update(Job appliedJob)
{
switch(appliedJob.Status)
{
case JobStatus.FILLED:
//Do something like sending email, //updating database, etc
break;
case JobStatus.REMOVED:
//Do something like sending email, //updating database, etc
break;
case JobStatus.SUSPENDED:
//Do something like sending email, //updating database, etc
break;
}
//Your own functionality
//End Of Functionality
}
}
#: Angular 2 CLI for Set up

#: AOT
Ahead-of-Time (AOT) compiler
An Angular application consists mainly of components and their HTML templates. Because the components and templates provided by Angular cannot be understood by the browser directly, Angular applications require a compilation process before they can run in a browser.
The Angular Ahead-of-Time (AOT) compiler converts your Angular HTML and TypeScript code into efficient JavaScript code during the build phase before the browser downloads and runs that code. Compiling your application during the build process provides a faster rendering in the browser.
This guide explains how to specify metadata and apply available compiler options to compile your applications efficiently using the AOT compiler.
Watch compiler author Tobias Bosch explain the Angular compiler at AngularConnect 2016.
Angular compilation
Angular offers two ways to compile your application:
- Just-in-Time (JIT), which compiles your app in the browser at runtime.
- Ahead-of-Time (AOT), which compiles your app at build time.
JIT compilation is the default when you run the ng build (build only) or ng serve (build and serve locally) CLI commands:
content_copyng build
ng serve
For AOT compilation, include the –aot option with the ng build or ng serve command:
content_copyng build –aot
ng serve –aot
The ng build command with the –prod meta-flag (ng build –prod) compiles with AOT by default.
See the CLI command reference and Building and serving Angular apps for more information.
Why compile with AOT?
Faster rendering
With AOT, the browser downloads a pre-compiled version of the application. The browser loads executable code so it can render the application immediately, without waiting to compile the app first.
Fewer asynchronous requests
The compiler inlines external HTML templates and CSS style sheets within the application JavaScript, eliminating separate ajax requests for those source files.
Smaller Angular framework download size
There’s no need to download the Angular compiler if the app is already compiled. The compiler is roughly half of Angular itself, so omitting it dramatically reduces the application payload.
Detect template errors earlier
The AOT compiler detects and reports template binding errors during the build step before users can see them.
Better security
AOT compiles HTML templates and components into JavaScript files long before they are served to the client. With no templates to read and no risky client-side HTML or JavaScript evaluation, there are fewer opportunities for injection attacks.
Controlling app compilation
When you use the Angular AOT compiler, you can control your app compilation in two ways:
- By providing template compiler options in the tsconfig.json file.
For more information, see Angular template compiler options.
#: How to enable lazy loading
Reference: https://angularfirebase.com/lessons/how-to-lazy-load-components-in-angular-4-in-three-steps/
Lazy loading is a technique in Angular that allows you to load JavaScript components asynchronously when a specific route is activated. This can add some initial performance during the initial load, especially if you have many components with complex routing. There are some good posts about lazy loading in angular, but I wanted to simplify it further. This lesson will show you how to enable lazy loading in 3 easy steps with a brand new app.

Step 1 – Create a new App with Routing
Our app will load the AppComponent by default at the root URL, then when the user navigates to lazy/load-me, the lazy module will be loaded asynchronously.
| ng new lazyDemo –routing |
Now add a link to the lazy url in the app component.
| <button routerLink=”/lazy/load-me”></button> <router-outlet></router-outlet> |
Step 2 – Generate the “Lazy” Module
Let’s create a module that will be lazy loaded, along with a couple components. The –flat flag prevents a directory from being created, then we can easily add components to the module via the Angular CLI.
| ng g module lazy –flat ng g component lazy-parent –module lazy ng g component lazy-child –module lazy |
Inside the lazy module we need to import the RouterModule. Two things to notice here:
- The route path to the component is path: ‘load-me’, even though it will actually be activated on lazy/load-me. This is a child route, which you will see come together in step 3
- The RouterModule calls forChild(routes).
| import { NgModule } from ‘@angular/core’; import { CommonModule } from ‘@angular/common’; import { LazyParentComponent } from ‘./lazy-parent/lazy-parent.component’; import { LazyChildComponent } from ‘./lazy-child/lazy-child.component’; import { Routes, RouterModule } from ‘@angular/router’; const routes: Routes = [ { path: ‘load-me’, component: LazyParentComponent } ]; @NgModule({ imports: [ CommonModule, RouterModule.forChild(routes) ], declarations: [ LazyParentComponent, LazyChildComponent ] }) export class LazyModule { } |
And here’s what the LazyParentComponent looks like. Just looping over the child component a few times.
| <div *ngFor=”let name of [‘Foo’, ‘Bar’, ‘Baz’]”> <p>Hi, my name is {{name}}. I’m a lazy child component.</p> <lazy-child></lazy-child> </div> |
Your Angular CLI config might append an app prefix to the component selector name. If so, make sure remove the prefix and for the last section to work properly. For example…
@Component({ selector: ‘lazy-child’ })
Step 3 – Point the App Router to the Lazy Module
The final step is to point the lazy route to the lazy module from the app router. We can do this with the loadChildren property with the path to the module file, then reference the module itself with a hash #. This tells angular to only load LazyModule when the lazy url is activated.
| import { NgModule } from ‘@angular/core’; import { Routes, RouterModule } from ‘@angular/router’; const routes: Routes = [ { path: ‘lazy’, loadChildren: ‘./lazy.module#LazyModule’} ]; @NgModule({ imports: [RouterModule.forRoot(routes)], exports: [RouterModule] }) export class AppRoutingModule { } |
Verify Lazy Loading is Working
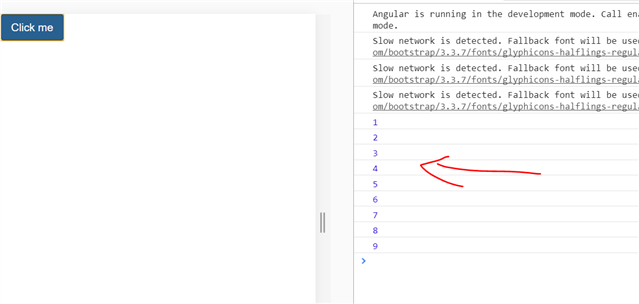
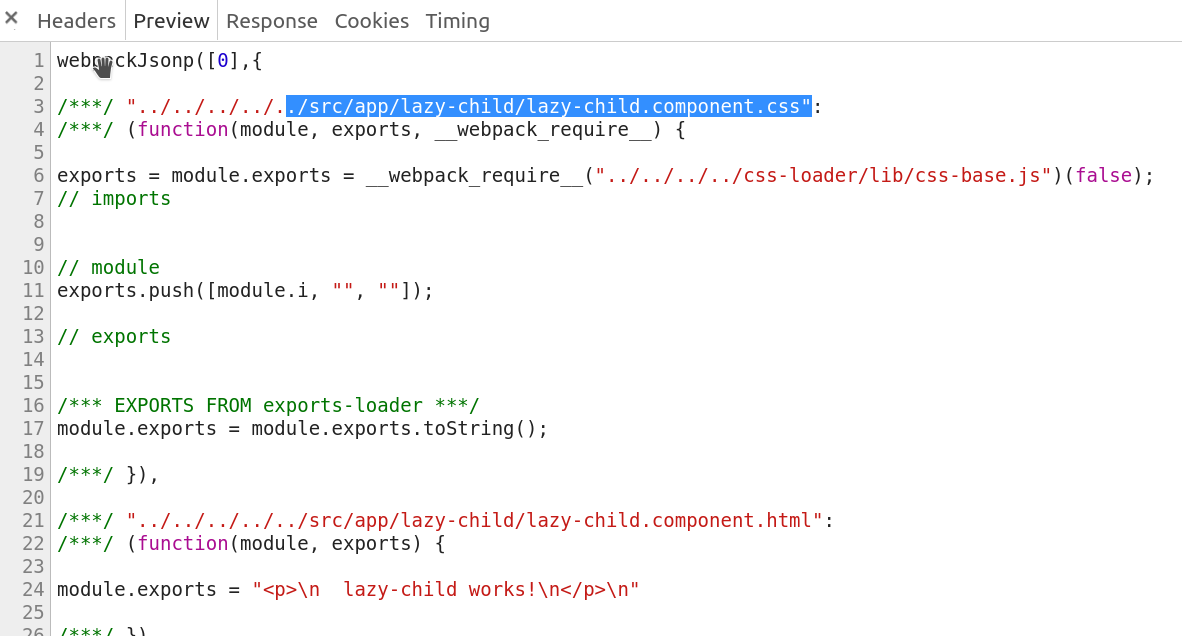
Let’s make sure Lazy Loading is working. In chrome, open developer tools and click the network tab. When you navigate to the lazy url, you should see a 0.chunk.js file rendered. In this demo, you can see it took 2ms to load.
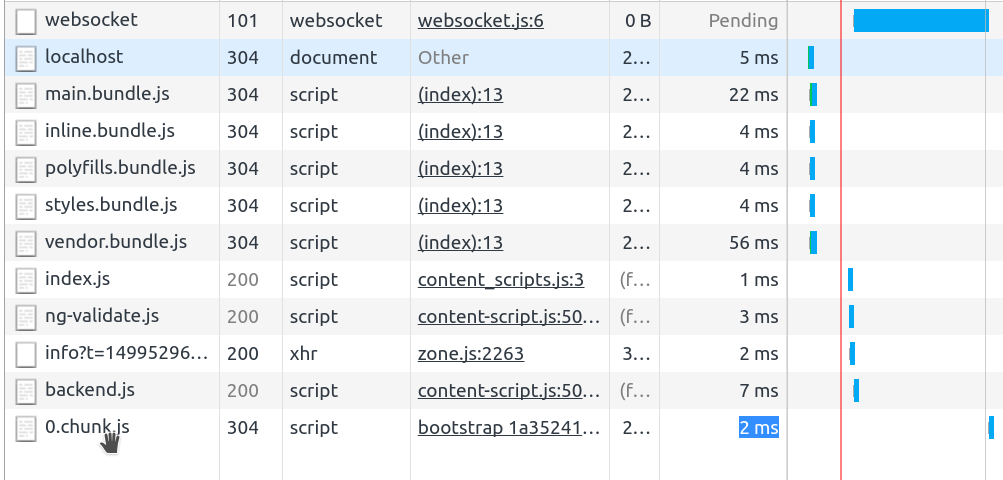
When you take a look inside this file, you should see a bunch of webpack JavaScript code with related to the lazy module and its components.
That’s it for lazy loading components in Angular. Good luck!
#: What are the main advantages in Angular 2
Angular CLI for fast development, cross platform, Structural Architecture, Limitations of Angular JS removed
#: Mobile First, how do you achieve it

#: When will you use NgOnInit or Constructor?
ngOnInit is just a method on a class which structurally is not different to any other method on a class. It’s just that Angular team decided to name it that way but it could have been any other name:
class MyComponent {
ngOnInit() { }
otherNameForNgOnInit() { }
}
And it’s completely up to you if you want to implement that method or not on a component class.
A constructor in turn is a different thing. Regardless whether you implement it or not in TypeScript class it’s still will be called when creating an instance of a class.
There’s a huge difference between the two from the perspective of the component initialization phase. Angular bootstrap process consists of the two major stages:
- constructing components tree
- running change detection
And the constructor of the component is called when Angular constructs components tree.
All lifecycle hooks including ngOnInit are called as part of the following change detection phase. Usually a component initialization logic requires either some DI providers or available input bindings or rendered DOM. And these are available at different stages of Angular bootstrap process.
When Angular constructs a components tree the root module injector is already configured so you can inject any global dependencies. Also, when Angular instantiates a child component class the injector for the parent component is also already set up so you can inject providers defined on the parent component including the parent component itself. A component constructor is the only method that is called in the context of the injector so if you need any dependency that’s the only place to get those dependencies.
The @Input communication mechanism is processed as part of change detection phase so input bindings are not available in constructor.
#: diff Ng-if and Ng-hide
ng-show (and its sibling ng–hide ) toggle the appearance of the element by adding the CSS display: none style. ng–if , on the other hand, actually removes the element from the DOM when the condition is false and only adds the element back once the condition turns true .