#: CSS selector, want to find all anchor tags with attribute begin with HTTP
$(‘a[href^=”http”]’)
#: CSS selector, want to find all anchor tags with attribute end with .org
$(‘a[href$=”.org”]’)
#: Have you used any charts
Fusion Charts, High Charts
#CSS animation / transformation
Animation:
/* The animation code */
@keyframes example {
from {background-color: red;}
to {background-color: yellow;}
}
/* The element to apply the animation to */
div {
width: 100px;
height: 100px;
background-color: red;
animation-name: example;
animation-duration: 4s;
}
Transformation:
2D transformation methods:
- translate()
- rotate()
- scale()
- skewX()
- skewY()
- matrix()
3D transformation methods:
- rotateX()
- rotateY()
- rotateZ()
#: How do you improve web application performance, what is the approach, spend a day or two .how do you analyze the code
Answer with your experience
#: What is oneway and one time data binding
Two-way data binding
Two-way data binding in AngularJS means binding data from Model to View and vice versa (Data flows from the Scope/Controller to the View and from the View to the scope/controller). ‘ng-model‘ is an angular directive used for achieving two-way data binding. Any modifications to that model from the Scope/Controller will be automatically propagated to the view regardless of whether the view is asking for the updated data and any modifications to that model from the View will be immediately reflected back to the Scope/Controller.
One-way data binding
One-way data binding in AngularJS means binding data from Model to View (Data flows from the scope/controller to the view). ‘ng-bind‘ is an angular directive used for achieving one-way data binding. After the binding, any modifications to that model from the scope/controller will be automatically propagated to the view regardless of whether the view is asking for the updated data. No propagation happens for any change to the model from the view to the controller.
One-time data binding
As its name suggests, the binding happens only once, ie, in the first digest cycle. One-time binding allows for a model or view to be updated ONCE from the value set by the controller upon the first digest cycle. As of AngularJS 1.3, you can use the “::” token to create one-time data bindings. These are bindings that deregister their own $watch() functions once the value has stabilized (which basically means the value is defined).
#: What is important keyword in CSS
The !important statement is used for breaking this order and adding weight to a specific declaration to put it in effect, ignoring the others. It is used for overriding the styles that are previously declared in other style sources, in order to achieve a certain design or layout goal.
#: Diff between div and span
The difference between span and div is that a span element is in-line and usually used for a small chunk of HTML inside a line (such as inside a paragraph) whereas a div (division) element is block-line (which is basically equivalent to having a line-break before and after it) and used to group larger chunks of code.
#: Replacement of promise in angular 4
Observables
#: Angular modules
Module in Angular refers to a place where you can group the components, directives, pipes, and services, which are related to the application.
In case you are developing a website, the header, footer, left, center and the right section become part of a module.
To define module, we can use the NgModule. When you create a new project using the Angular –cli command, the ngmodule is created in the app.module.ts file by default and it looks as follows −
import{BrowserModule}from’@angular/platform-browser’;
import{NgModule}from’@angular/core’;
import{AppComponent}from’./app.component’;
@NgModule({
declarations:[
AppComponent
],
imports:[
BrowserModule
],
providers:[],
bootstrap:[AppComponent]
})
exportclassAppModule{}
The NgModule needs to be imported as follows −
import { NgModule } from ‘@angular/core’;
The structure for the ngmodule is as shown below −
@NgModule({
declarations:[
AppComponent
],
imports:[
BrowserModule
],
providers:[],
bootstrap:[AppComponent]
})
It starts with @NgModule and contains an object which has declarations, import s, providers and bootstrap.
Declaration
It is an array of components created. If any new component gets created, it will be imported first and the reference will be included in declarations as shown below −
declarations: [
AppComponent,
NewCmpComponent
]
Import
It is an array of modules required to be used in the application. It can also be used by the components in the Declaration array. For example, right now in the @NgModule we see the Browser Module imported. In case your application needs forms, you can include the module as follows −
import { FormsModule } from ‘@angular/forms’;
The import in the @NgModule will be like the following −
imports: [
BrowserModule,
FormsModule
]
Providers
This will include the services created.
Bootstrap
This includes the main app component for starting the execution.
# Interceptors
Pre process& post process logic to add: e.g. say date transformation
Below is the screen shot for the starter project created for your references:
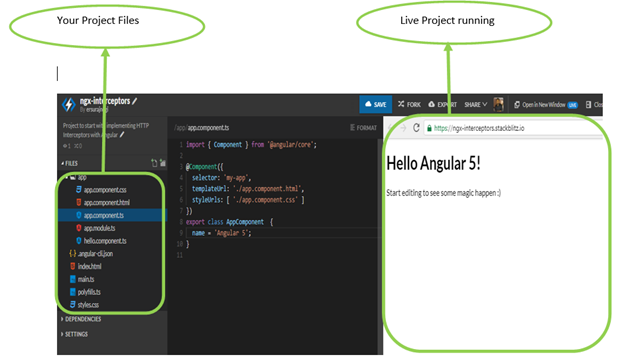
Stackblitz.com
How to Implement the Interceptors in Angular with code:
Below is the list of steps we need to do to implement the Interceptors in our Angular App:
1. We need to Import the HttpClientModule into our application in app.
2. We need to add a Class decorated with Injector Decorator, where we will write our logic for Interceptors.
3. Then we need to provide information to angular to use our class from 2nd step as interceptors.
Enough with the theory now, let’s do some coding now.
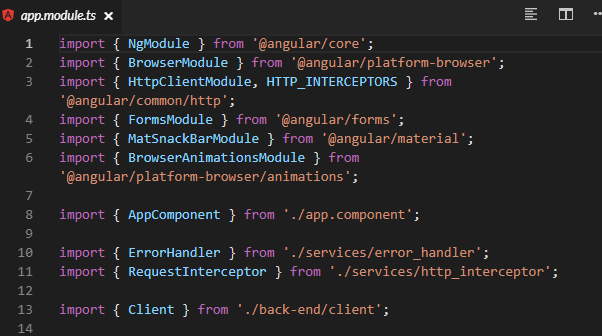
First of all, to make any http call we need to import HttpClientModule into our application in app.module.ts as follow:
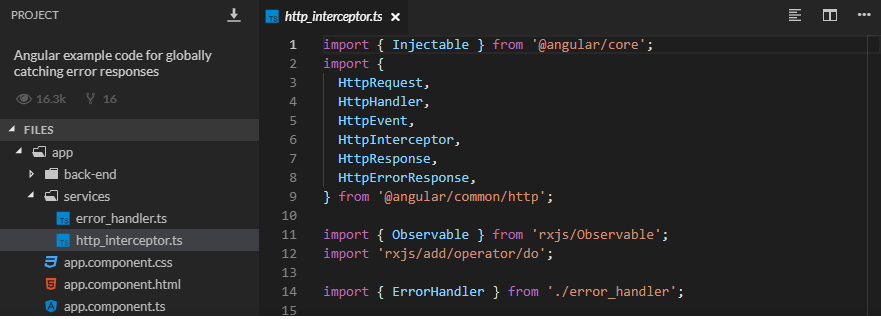
After this, we need to add a class which will work as an interceptor for us. Let’s create a file named as my-interceptor.ts and copy the below code in it save it.
I know this is a lot of code, but don’t be afraid. Let me explain the above code, then it will be clear for your guys.
1. First we are importing the necessary modules:

Necessary Imports
2. Here I am creating our interceptor class which is implementing HttpInterceptor Interface which is provided http module to create Interceptors:

3. Here we are implementing the Interceptor function provided by HttpInterceptor interface.

4. Here we are updating our request parameter by adding a header field “Authorization”.

This is the main code block of our interceptor logic where we are intercepting all the request and responses.
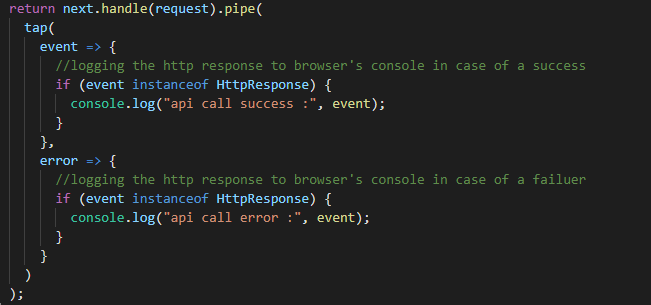
I hope now it is clear to all of you guys what we are actually doing in interceptor class.
Now we have all the logic for our interceptors, but it will not work as we haven’t notified Angular to use this class as an interceptor. For this we need modify our app.module.ts file. Let’s just do that:
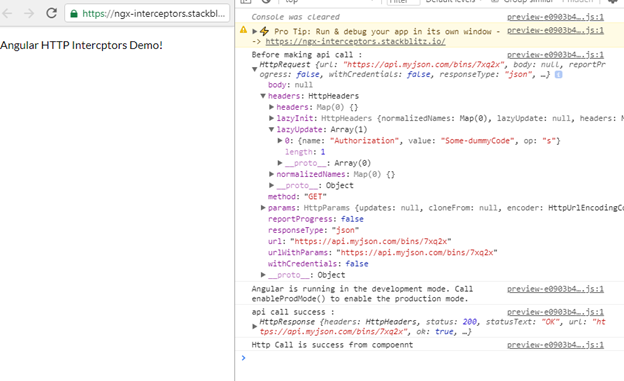
Now our code is ready. Now we just need to make some Http Calls to verify if our interceptor is working as expected or not.
Let’s just modify our app.component.ts, to make some dummy http call and then check for the console to see the logs.
Below is the browser console screen shot, we can see our interceptor is working and our header “Authorization” is getting added for all the requests:
#: Caching data
Inside interceptor the logic can be coded to store the reponse.

#: Prototype in JS
The JavaScript prototype property allows you to add new properties to object constructors:
Example
function Person(first, last, age, eyecolor) {
this.firstName = first;
this.lastName = last;
this.age = age;
this.eyeColor = eyecolor;
}
Person.prototype.nationality = “English”;
#: Grid layout or Text layout
When people first encounter CSS Grid Layout, they tend to think of Grid as being the controller of the major page layout, providing a framework for headers and sidebars, main content and footers.
You can see this use case in this example. Only the direct children become a Grid Item and so by declaring a Grid on my wrapper the header, panel, content and footer all become Grid Items and can be placed onto that Grid. Any elements inside those main containers can then be laid out by whichever method makes sense.
Flexbox is not so well suited to creating these types of layouts. It is certainly possible to create a simple layout like the one above using Flexbox. However once flex items wrap, each row (or column if working with flex-direction: column), becomes a flex container itself. Space distribution happens across that row or column, you lose the ability to line things up with items in rows above.
Here we find the biggest difference between Grid and Flexbox.
Flexbox is essentially for laying out items in a single dimension – in a row OR a column. Grid is for layout of items in two dimensions – rows AND columns.
#: CSSem
- “Ems” (em): The “em” is a scalable unit that is used in web document media. An em is equal to the current font-size, for instance, if the font-size of the document is 12pt, 1em is equal to 12pt. Ems are scalable in nature, so 2em would equal 24pt, .5em would equal 6pt, etc. Ems are becoming increasingly popular in web documents due to scalability and their mobile-device-friendly nature.
- Pixels (px): Pixels are fixed-size units that are used in screen media (i.e. to be read on the computer screen). One pixel is equal to one dot on the computer screen (the smallest division of your screen’s resolution). Many web designers use pixel units in web documents in order to produce a pixel-perfect representation of their site as it is rendered in the browser. One problem with the pixel unit is that it does not scale upward for visually-impaired readers or downward to fit mobile devices.
- Points (pt): Points are traditionally used in print media (anything that is to be printed on paper, etc.). One point is equal to 1/72 of an inch. Points are much like pixels, in that they are fixed-size units and cannot scale in size.
- Percent (%): The percent unit is much like the “em” unit, save for a few fundamental differences. First and foremost, the current font-size is equal to 100% (i.e. 12pt = 100%). While using the percent unit, your text remains fully scalable for mobile devices and for accessibility.
So, What’s the Difference?
It’s easy to understand the difference between font-size units when you see them in action. Generally, 1em = 12pt = 16px = 100%. When using these font-sizes, let’s see what happens when you increase the base font size (using the body CSS selector) from 100% to 120%.
As you can see, both the em and percent units get larger as the base font-size increases, but pixels and points do not.
#: http get, how do you handle exception
http errors if you attach a catch to your request. This can possibly look like this:

When your application grows, the amount of HTTP requests increases as well. Attaching a catch to every request is not exactly DRY. As of Angular 4.3, where a new HttpModule is introduced, we can finally use the traditional interceptor again.


#: What is fxcop
FxCop is a free static code analysis tool from Microsoft that checks .NET managed code assemblies for conformance to Microsoft’s .NET Framework Design Guidelines. Unlike StyleCop, or the Lint programming tool, for the C programming language,FxCop analyzes the compiled object code, not the original source code.
#: normalize or reset css
All web browsers add their own style formatting to HTML elements for a more readable document. But not all browsers treat HTML in the same way. For example, Safari and Chrome will display the same HTML document differently, and these differences are due to built-in browser styling.
To avoid cross-browser style inconsistency, you can create a fresh clean slate by getting rid of the built-in browser styling.
This is where CSS Reset and Normalize.css come into play.
The CSS Reset stylesheet is a basic template to wipe out all built-in styling for HTML elements. You can customize your CSS Reset stylesheet, and add your own preferred styling choices for your webpage. CSS Reset can be found hereby Eric Meyer.
The Normalize.css stylesheet also removes browser inconsistencies for HTML elements, but instead of removing everything like CSS Reset, normalize.css will preserve some useful defaults. Normalize.css was created to make built-in browser styling consistent across all browsers. A lot of people in the tech community refer to Normalize.css as “the new reset.”
#: JavaScript “this” keyword
var person = {
firstName: “John”,
lastName : “Doe”,
id : 5566,
fullName : function() {
return this.firstName + ” ” + this.lastName;
}
};
What is this?
The JavaScript this keyword refers to the object it belongs to.
This has different values depending on where it is used.
- In a method, this refers to the owner object.
- Alone, this refers to the global object.
- In a function, this refers to the global object.
- In a function, in strict mode, this is undefined.
- In an event, this refers to the element that received the event.
- Methods like call(), and apply() can refer this to any object.
#: How to implement Inheritance using typescript
Introduction
Traditional JavaScript uses functions and prototype-based inheritance to build up reusable components, but this may feel a bit awkward to programmers more comfortable with an object-oriented approach, where classes inherit functionality and objects are built from these classes. Starting with ECMAScript 2015, also known as ECMAScript 6, JavaScript programmers will be able to build their applications using this object-oriented class-based approach. In TypeScript, we allow developers to use these techniques now, and compile them down to JavaScript that works across all major browsers and platforms, without having to wait for the next version of JavaScript.
Classes
Let’s take a look at a simple class-based example:
class Greeter {
greeting: string;
constructor(message: string) {
this.greeting = message;
}
greet() {
return“Hello, ” + this.greeting;
}
}
let greeter = new Greeter(“world”);
The syntax should look familiar if you’ve used C# or Java before. We declare a new class Greeter. This class has three members: a property called greeting, a constructor, and a method greet.
You’ll notice that in the class when we refer to one of the members of the class we prepend this.. This denotes that it’s a member access.
In the last line we construct an instance of the Greeter class using new. This calls into the constructor we defined earlier, creating a new object with the Greeter shape, and running the constructor to initialize it.
Inheritance
In TypeScript, we can use common object-oriented patterns. One of the most fundamental patterns in class-based programming is being able to extend existing classes to create new ones using inheritance.
Let’s take a look at an example:
class Animal {
move(distanceInMeters: number = 0) {
console.log(`Animal moved ${distanceInMeters}m.`);
}
}
class Dog extends Animal {
bark() {
console.log(‘Woof! Woof!’);
}
}
const dog = new Dog();
dog.bark();
dog.move(10);
dog.bark();
This example shows the most basic inheritance feature: classes inherit properties and methods from base classes. Here, Dog is a derived class that derives from the Animal base class using the extends keyword. Derived classes are often called subclasses, and base classes are often called superclasses.
Because Dog extends the functionality from Animal, we were able to create an instance of Dog that could both bark() and move().
#: Rest API – what are the verbs in it

#: Soap vs Rest
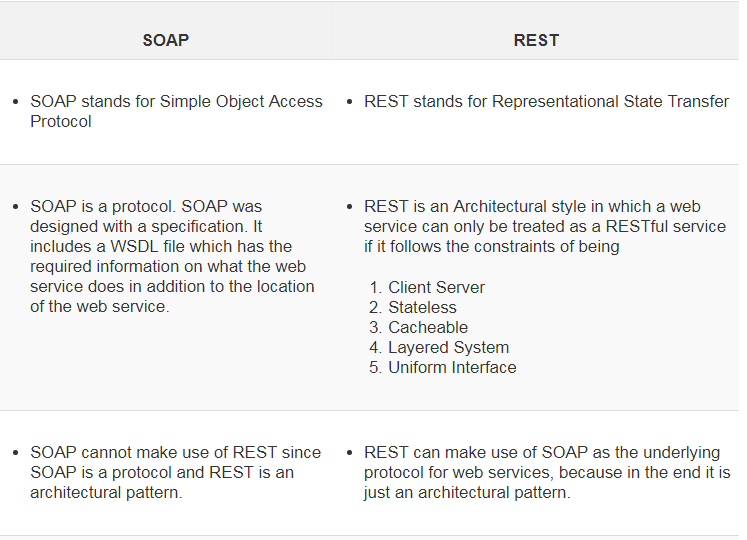
Let’ have a quick overview of SOAP and REST before we do a deep dive into the key differences between them.
SOAP – SOAP is a protocol which was designed before REST and came into the picture. The main idea behind designing SOAP was to ensure that programs built on different platforms and programming languages could exchange data in an easy manner.
REST – This was designed specifically for working with components such as media components, files, or even objects on a particular hardware device. Any web service that is defined on the principles of REST can be called a RestFul web service. A Restful service would use the normal HTTP verbs of GET, POST, PUT and DELETE for working with the required components.

#: JQuery and AngularJS difference
AngularJS is a framework. It has following features
- Two way data binding
- MVW pattern (MVC-ish)
- Template
- Custom-directive (reusable components, custom markup)
- REST-friendly
- Deep Linking (set up a link for any dynamic page)
- Form Validation
- Server Communication
- Localization
- Dependency injection
- Full testing environment (both unit, e2e)
jQuery: The Write Less, Do More, JavaScript Library.
#: Can we bootstrap multiple modules in one app
Yes, however all the bootstrap components has to be present in the main html
#: JavaScript null & undefined
Undefined = declared but not initialized
Null = is an object with no values
#: Node JS call back
Callback is an asynchronous equivalent for a function. A callback function is called at the completion of a given task. Node makes heavy use of callbacks. All the APIs of Node are written in such a way that they support callbacks.
For example, a function to read a file may start reading file and return the control to the execution environment immediately so that the next instruction can be executed. Once file I/O is complete, it will call the callback function while passing the callback function, the content of the file as a parameter. So there is no blocking or wait for File I/O. This makes Node.js highly scalable, as it can process a high number of requests without waiting for any function to return results.
#: difference between get and post
HTTP POST requests supply additional data from the client (browser) to the server in the message body. In contrast, GET requests include all required data in the URL
#: Why root scope impact performance
global state sucks and you should use $rootScope sparingly, like you would (hopefully) use with global variables in any language. In particular, don’t use it for code, only data. If you’re tempted to put a function on $rootScope, it’s almost always better to put it in a service that can be injected where it’s needed, and more easily tested.
#: What is $broadcast and emit
They are not doing the same job: $emit dispatches an event upwards through the scope hierarchy, while $broadcast dispatches an event downwards to all child scopes.
#: ViewBag is similar to $scope.If so how it’s similar?
ViewBag and ViewData are used to communicate between controller and corresponding view
TempData is stored data just like live session for short time.
#: What is isolated scope
Isolating scope is recommend for passing data between custom directive and its parent scope to prevent unintentionally changing the parent scope.
When building a single page web app, reusable components can be useful. AngularJS custom directives are used as reusable components in AngularJS. Although, it is a very efficient way to introduce components in a single page app, you can get easily disarrayed with the scope in AngularJS directives.
Here is a simple example I made to understand how data can be passed between AngularJS custom directive scope and its parent scope.
Isolating scope is recommend for passing data between custom directive and its parent scope to prevent unintentionally changing the parent scope.
index.html

There are two instances of a directive called ‘exampleDirective’ in this example, which is invoked by ‘example-directive’ html tags. One is passing data using a custom attribute called ‘val-through-at’, and the other, using ‘val-through-equals’. In the example, you can see that val-through-at =”{{outerVal}}”, while val-through-equals=”outerVal”.
Below is the javascript file, app.js, with the directive.

app.js
In the browser, there are two panels, which are two instances of ‘exampleDirective’.

In the app.js, the directive has isolated scope:
Using the isolated scope, the values in the outer scope can be passed into the directive scope.
When the outer value is added, it is passed into the directive scopes.
How are the binding with ‘@’ different from the binding with ‘=’? Simply put, ‘@’ tells the directive to receive the value from the outer scope one-way (one-way binding) as a string. The one-way here means even if you change the value in the directive scope, that would not affect the value in the parent scope. Going back to the HTML directive tags, why use an interpolation in the custom attribute val-through-at =”{{outerVal}}”? The interpolation, {{outerVal}}, is used to convert the model, outerValue, to a string, since the one-way binding using ‘@’, passes the value as a string.
When the value through @ (one-way binding) is changed, that does not affect the outer value.
How about ‘=’? The equal sign tells the directive to transfer the values two-way (two-way binding) as a data model. This means that if you change the value (valueThroughEquals) in the directive scope, that would affect the value in the parent scope (outerVal).
#: How to make parallel call in WebAPI

#: Arraylist and list
ArrayList is the collections of different types data whereas List<> is the collection of similar type of its own depedencties.
#: How to improve performance of API
Use the fastest JSON serializer available.
Use compression techniques.
Use faster data access strategies.
Use caching.
Use asynchronous methods judiciously.
#: How to dispose unmanaged resource
Unmanaged resources will be freed in two places:
- The Dispose() method. This should be the normal way that you dispose unmanaged resources.
- The Finalizer. This is a last-resort mechanism. If a class has a finalizer it will be called by the Garbage Collector when it cleans up a dead object. Any class which has an unmanaged resource should have a finalizer to clean up if the programmer forgets to call Dispose().
#: What is attribute routing and what is the use of it
Feature from MVC 5
public static void RegisterRoutes(RouteCollection routes)
{
routes.IgnoreRoute(“{resource}.axd/{*pathInfo}”);
routes.MapMvcAttributeRoutes();
routes.MapRoute(
name: “Default”,
url: “{controller}/{action}/{id}”,
defaults: new { controller = “Home”, action = “Index”, id = UrlParameter.Optional }
);
}
#: Can we implement MVC in client side
Client side MVC means that a MVC framework is built entirely on the client side. So the server only delivers data to the application. The binding of the data to the models happens client side. An example of a framework that implements this principle is AngularJs
Array vsArraylistvs List
Array is faster than list
Array is faster and that is because ArrayList uses a fixed amount of array.
ArrayList is an ordered Collection of objects, the objects will be in the same order that you use to add them to the ArrayList.
HashTable is a Collection of Key Value Pair. … But when you have to lookup for an element the HashTable (using the key to search) is faster than the ArrayList.
#: How do you clone the Object in JavaScript
- Using Object.assign
Update: This method has a flaw that it only does a shallow copy. It means that nested properties are still going to be copied by reference.
- Converting to JSON and back
functionjsonCopy(src) {
return JSON.parse(JSON.stringify(src));
}
const source = {a:1, b:2, c:3};
const target = jsonCopy(source);
console.log(target); // {a:1, b:2, c:3}
// Check if clones it and not changing it
source.a = ‘a’;
console.log(source.a); // ‘a’
console.log(target.a); // 1
Note: Be careful about using this method as your source object MUST be JSON safe. So it may need some sort of exception handling to keep it safe in cases in which the source object is not convertible to JSON.
- Iterating through object
#: What are Closures
Remember self-invoking functions? What does this function do?
Example
var add = (function () {
var counter = 0;
return function () {counter += 1; return counter}
})();
add();
add();
add();
// the counter is now 3
Example Explained
The variable add is assigned the return value of a self-invoking function.
The self-invoking function only runs once. It sets the counter to zero (0), and returns a function expression.
This way add becomes a function. The “wonderful” part is that it can access the counter in the parent scope.
This is called a JavaScript closure. It makes it possible for a function to have “private” variables.
The counter is protected by the scope of the anonymous function, and can only be changed using the add function.
A closure is a function having access to the parent scope, even after the parent function has closed.
#: How to define array, how to add elements , how to remove elements and how to remove add elements by index
ADD to array:
- Using push() to add to the end of an array
- Using unshift() to add to the beginning of an array
- Using splice() to add elements within an array
- Using concat() to combine and create new, longer arrays
- Using Index Notation to specify an index at which to add an element
Now let’s discuss how and when to execute each of these commands.
Add to the End of an Array Using push()
The push() method will add an element to the end of an array, while its twin function, the pop()method, will remove an element from the end of the array.
To add an element to the end of an array using push(), you would do this:
| 123 | var list = [“foo”, “bar”];list.push(“baz”);[“foo”, “bar”, “baz”] // result |
You can also add multiple elements to an array using push(), as shown below:
| 123 | var list = [“foo”, “bar”];list.push(“baz”, “qux”, “etcetera”);[“foo”, “bar”, “baz”, “qux”, “etcetera”] // result |
If you need to add an element or multiple elements to the end of an array, the push() method will almost always be your simplest and quickest option.
Add to the Beginning of an Array Using unshift()
The unshift() method will add an element to the beginning of an array, while its twin function, shift(), will remove one element from the beginning of the array.
To add an element to the beginning of an array using unshift() try this:
| 123 | var list = [“foo”, “bar”];list.unshift(“baz”);[“baz”, “foo”, “bar”] // result |
To add multiple elements to the beginning of an array using unshift() try this:
| 123 | var list = [“foo”, “bar”];list.unshift(“baz”, “qux”);[“baz”, “qux”, “foo”, “bar”] // result |
If you need to add elements to the beginning of an array, the unshift() method will almost always be your simplest and quickest option.
Add Element(s) to the Middle of an Array Using splice()
The splice() method modifies the content of an array by removing existing elements and/or adding new elements.
Below you’ll find the proper splice() function syntax:
| 1 | array.splice( start, deleteCount [, item1 [, item2 [, …] ] ] ) |
If you want to insert an element (or elements) into a particular point somewhere within the array, besides the beginning or end, then you should most likely be using the splice() method.
To use splice() your code should look like this:
| 1234 | var list = [“foo”, “bar”];list.splice( 1, 0, “baz”); // at index position 1, remove 0 elements, then add “baz” to that position // element “bar” will now automatically be moved to index position 2[“foo”, “baz”, “bar”] // result |
To add multiple elements in the middle of an array using splice() try this:
| 123 | var list = [“foo”, “bar”];list.splice( 1, 0, “baz”, “qux”);[“foo”, “baz”, “qux”, “bar”] // result |
The splice command is like the Swiss Army Knife of array manipulation; however, you should first try using the much simpler push or unshift commands before using splice() to add to an array.
Add to an Array By Forming a New Array Using concat()
The concat() method returns a new combined array comprised of the array on which it is called, joined with the array (or arrays) from its argument.
To add some elements to another array using concat() do the following:
| 123 | var list = [“foo”, “bar”];var newlist = list.concat( [“baz”, “qux”] );[“foo”, “bar”, “baz”, “qux”] // newlist result |
It is also possible to directly add non-array values using concat():
| 123 | var list = [“foo”, “bar”];var newlist = list.concat( “baz”, “qux” );[“foo”, “bar”, “baz”, “qux”] // newlist result |
The concat() method is a simple solution in situations where you need to combine some arrays together, without bloating your code with for loops or other iterative loops.
Add an Array Element at a Particular Index Using Index Notation
We can also directly manipulate the array, without the use of any array methods, by referring to the index position within the array.
Here we add two new elements at specified positions:
| 1234 | var list = [“foo”, “bar”];list[2] = “baz”; // add element “baz” to the index position 2 in the arraylist[3] = “qux”;[“foo”, “bar”, “baz”, “qux”] // result |
Here we add an element to the end of the array:
| 123 | var list = [“foo”, “bar”];list[ list.length ] = “baz”; // add element “baz” to the end of the array[“foo”, “bar”, “baz”] // result |
The index notation method is often useful when you know exactly where to place an element in the array, regardless of where that position may be. This situation often applies to many sorts of algorithm implementations.
There are different methods and techniques you can use to remove elements from JavaScript arrays:
- pop – Removes from the End of an Array
- shift – Removes from the beginning of an Array
- splice – removes from a specific Array index
- filter – allows you to programatically remove elements from an Array
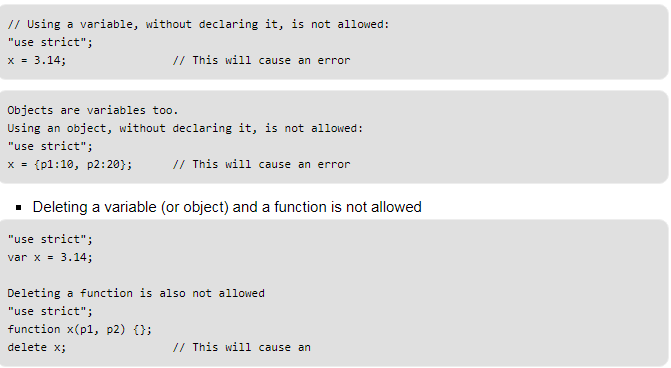
#: What is use of strictkeyword.
This strict context prevents certain actions from being taken and throws more exceptions.
#: What are extension methods
Extension Methods are a new feature in C# 3.0. An Extension Method enables us to add methods to existing types without creating a new derived type, recompiling, or modify the original types. We can say that it extends the functionality of an existing type in .NET. An Extension Method is a static method to the existing static class. We call an Extension Method in the same general way; there is no difference in calling.
An Extension Method is:
- It is a static method.
- It must be located in a static class.
- It uses the “this” keyword as the first parameter with a type in .Net and this method will called by a given type instance on the client side.
- It also shown by VS intellisense. When we press the dot (.) after a type instance then it comes in VS intellisense.
- An Extension Method should be in the same namespace as it is used or you need to import the namespace of the class by a using statement.
- You can give any name of for the class that has an Extension Method but the class should be static.
- If you want to add new methods to a type and you don’t have the source code for it then the solution is to use and implement Extension Methods of that type.
- If you create Extension Methods that have the same signature methods as the type you are extending then the Extension Methods will never be called.
We create an Extension Method for a string type so string will be specified as a parameter for this Extension Method and that method will be called by a string instance using the dot operator.
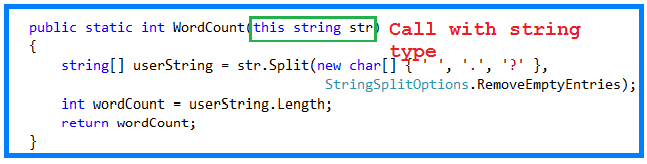
In the above method WordCount(), we are passing a string type with this so it will be called by the string type variable, in other words a string instance.
Now we create a static class and two static methods, one for the total word count in a string and another for the total number of characters in a string without a space.
- using System;
- namespace ExtensionMethodsExample
- {
- public static class Extension
- {
- public static int WordCount(this string str)
- {
- string[] userString = str.Split(new char[] { ‘ ‘, ‘.’, ‘?’ },
- StringSplitOptions.RemoveEmptyEntries);
- int wordCount = userString.Length;
- return wordCount;
- }
- public static int TotalCharWithoutSpace(this string str)
- {
- int totalCharWithoutSpace = 0;
- string[] userString = str.Split(‘ ‘);
- foreach (string stringValue in userString)
- {
- totalCharWithoutSpace += stringValue.Length;
- }
- return totalCharWithoutSpace;
- }
- }
- }
Now we create an executable program that has a string as an input and uses an Extension Method to count the total words in that string and the total number of characters in that string then show the result in a console screen.
- using System;
- namespace ExtensionMethodsExample
- {
- class Program
- {
- static void Main(string[] args)
- {
- string userSentance = string.Empty;
- int totalWords = 0;
- int totalCharWithoutSpace = 0;
- Console.WriteLine(“Enter the your sentance”);
- userSentance = Console.ReadLine();
- //calling Extension Method WordCount
- totalWords = userSentance.WordCount();
- Console.WriteLine(“Total number of words is :”+ totalWords);
- //calling Extension Method to count character
- totalCharWithoutSpace = userSentance.TotalCharWithoutSpace();
- Console.WriteLine(“Total number of character is :”+totalCharWithoutSpace);
- Console.ReadKey();
- }
- }
- }

#: Difference between string and string builder
Mutable means changeable
String is immutable, if you try to alter their values, another object gets created, whereas StringBuffer and StringBuilder are mutable so they can change their values. Thread-Safety Difference: Thedifference between StringBuffer and StringBuilderis that StringBuffer is thread-safe.
#: What is hashtable and dictionary
Dictionary
- Dictionary is generic type Dictionary<TKey,TValue>
- Dictionary class is a strong type <TKey,TValue> Hence, you must specify the data types for key and value.
- There is no need of boxing/unboxing.
- When you try to access non existing key dictionary, it gives runtime error.
- Dictionary maintains an order of the stored values.
- There is no need of boxing/unboxing, so it is faster than Hashtable.
Hashtable
- Hashtable is non-generic type.
- Hashtable is a weakly typed data structure, so you can add keys and values of any object type.
- Values need to have boxing/unboxing.
- When you try to access non existing key Hashtable, it gives null values.
- Hashtable never maintains an order of the stored values.
- Hashtable needs boxing/unboxing, so it is slower than Dictionary.
#: What is block and inline elements
A block-level element always starts on a new line and takes up the full width available (stretches out to the left and right as far as it can).
The <div> element is a block-level element.
An inline element does not start on a new line and only takes up as much width as necessary.
This is an inline <span> element inside a paragraph.
#: What is position property and its values
The position property specifies the type of positioning method used for an element (static, relative, fixed, absolute or sticky).
The position Property
The position property specifies the type of positioning method used for an element.
There are five different position values:
- static
- relative
- fixed
- absolute
- sticky
Elements are then positioned using the top, bottom, left, and right properties. However, these properties will not work unless the position property is set first. They also work differently depending on the position value.
position: static;
HTML elements are positioned static by default.
Static positioned elements are not affected by the top, bottom, left, and right properties.
An element with position: static; is not positioned in any special way; it is always positioned according to the normal flow of the page:
This <div> element has position: static;
Here is the CSS that is used:
Example
div.static {
position: static;
border: 3px solid #73AD21;
}
position: relative;
An element with position: relative; is positioned relative to its normal position.
Setting the top, right, bottom, and left properties of a relatively-positioned element will cause it to be adjusted away from its normal position. Other content will not be adjusted to fit into any gap left by the element.
This <div> element has position: relative;
Here is the CSS that is used:
Example
div.relative {
position: relative;
left: 30px;
border: 3px solid #73AD21;
}
position: fixed;
An element with position: fixed; is positioned relative to the viewport, which means it always stays in the same place even if the page is scrolled. The top, right, bottom, and left properties are used to position the element.
A fixed element does not leave a gap in the page where it would normally have been located.
Notice the fixed element in the lower-right corner of the page. Here is the CSS that is used:
Example
div.fixed {
position: fixed;
bottom: 0;
right: 0;
width: 300px;
border: 3px solid #73AD21;
}
This <div> element has position: fixed;
position: absolute;
An element with position: absolute; is positioned relative to the nearest positioned ancestor (instead of positioned relative to the viewport, like fixed).
However; if an absolute positioned element has no positioned ancestors, it uses the document body, and moves along with page scrolling.
Note: A “positioned” element is one whose position is anything except static.
Here is a simple example:
This <div> element has position: relative;
This <div> element has position: absolute;
Here is the CSS that is used:
Example
div.relative {
position: relative;
width: 400px;
height: 200px;
border: 3px solid #73AD21;
}
div.absolute {
position: absolute;
top: 80px;
right: 0;
width: 200px;
height: 100px;
border: 3px solid #73AD21;
}
position: sticky;
An element with position: sticky; is positioned based on the user’s scroll position.
A sticky element toggles between relative and fixed, depending on the scroll position. It is positioned relative until a given offset position is met in the viewport – then it “sticks” in place (like position:fixed).
Note: Internet Explorer, Edge 15 and earlier versions do not support sticky positioning. Safari requires a -webkit- prefix (see example below). You must also specify at least one of top, right, bottom or left for sticky positioning to work.
In this example, the sticky element sticks to the top of the page (top: 0), when you reach its scroll position.
Example
div.sticky {
position: -webkit-sticky; /* Safari */
position: sticky;
top: 0;
background-color: green;
border: 2px solid #4CAF50;
}
Overlapping Elements
When elements are positioned, they can overlap other elements.
The z-index property specifies the stack order of an element (which element should be placed in front of, or behind, the others).
An element can have a positive or negative stack order:
Because the image has a z-index of -1, it will be placed behind the text.
Example
img {
position: absolute;
left: 0px;
top: 0px;
z-index: -1;
}
An element with greater stack order is always in front of an element with a lower stack order.
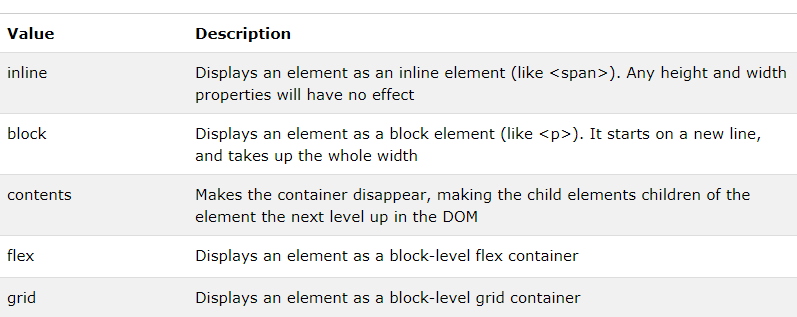
#: Explain display property
#: Explain transition
To create a transition effect, you must specify two things:
- the CSS property you want to add an effect to
- the duration of the effect
Note: If the duration part is not specified, the transition will have no effect, because the default value is 0.
The following example shows a 100px * 100px red <div> element. The <div> element has also specified a transition effect for the width property, with a duration of 2 seconds:
Example
div {
width: 100px;
height: 100px;
background: red;
-webkit-transition: width 2s; /* Safari */
transition: width 2s;
}
The transition effect will start when the specified CSS property (width) changes value.
#: CSS how to specify
<link rel=”stylesheet” type=”text/css” href=”mystyle.css“>